Creating a New Art Piece
Instructions
Log into the VR-All-Art Dashboard.
In the left side panel select Art Pieces > New.
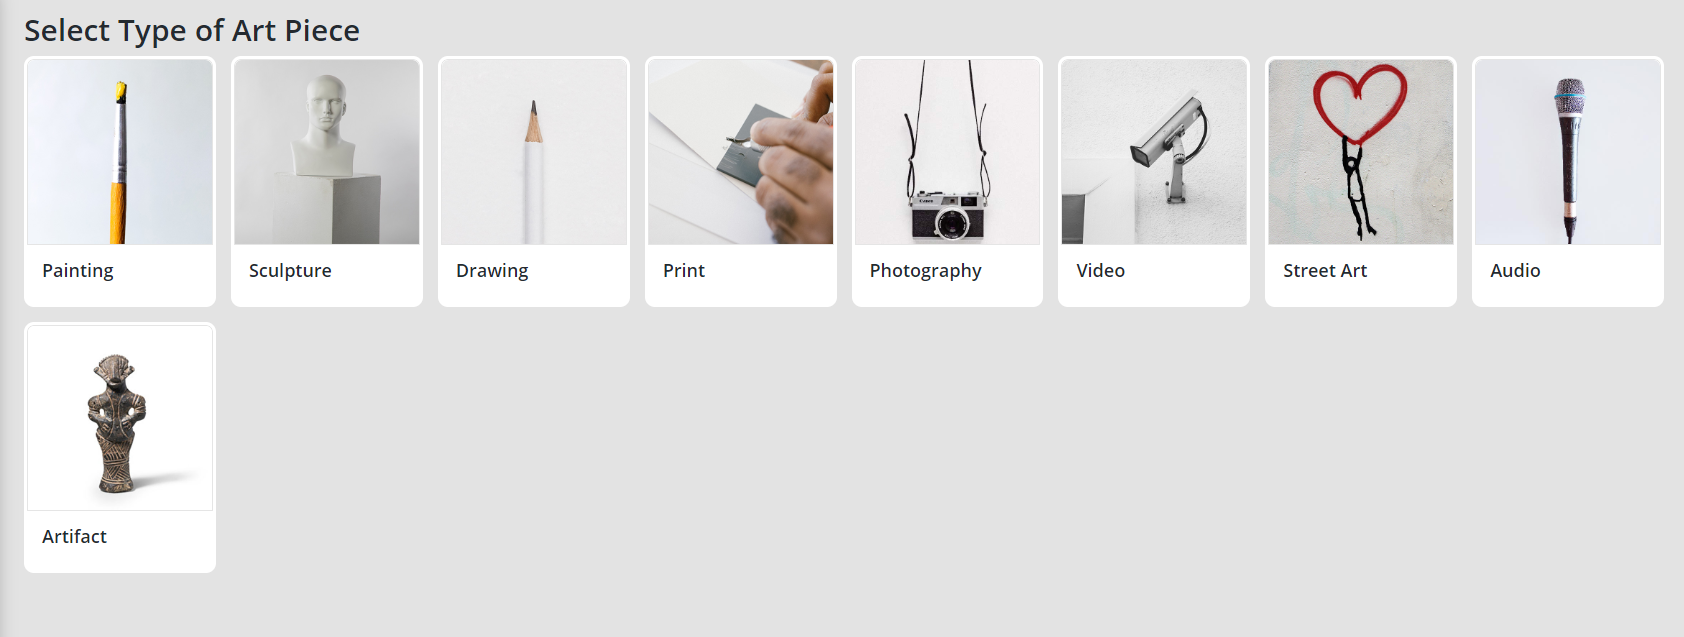
Choose type of Art Piece
Next, select the type of art piece you would like to create.
Currently, the offered categories are: Painting, Sculpture, Drawing, Print, Photography, Video, Street Art, Audio, Artifact.
Painting
To create a new Painting, follow these steps:
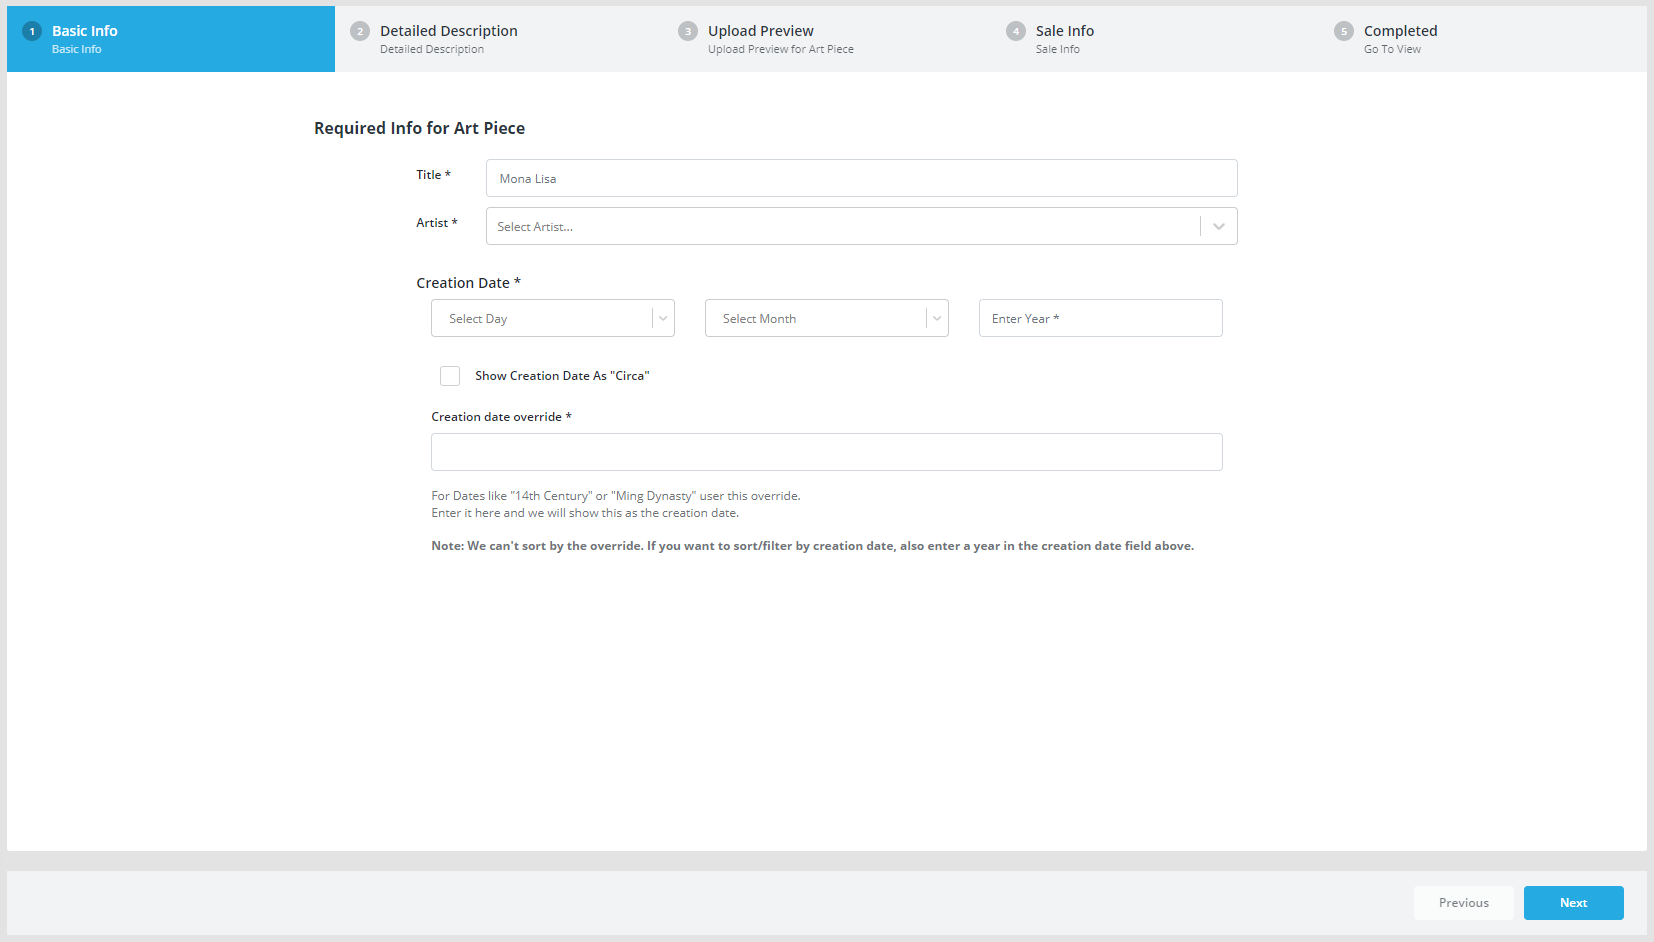
STEP 1
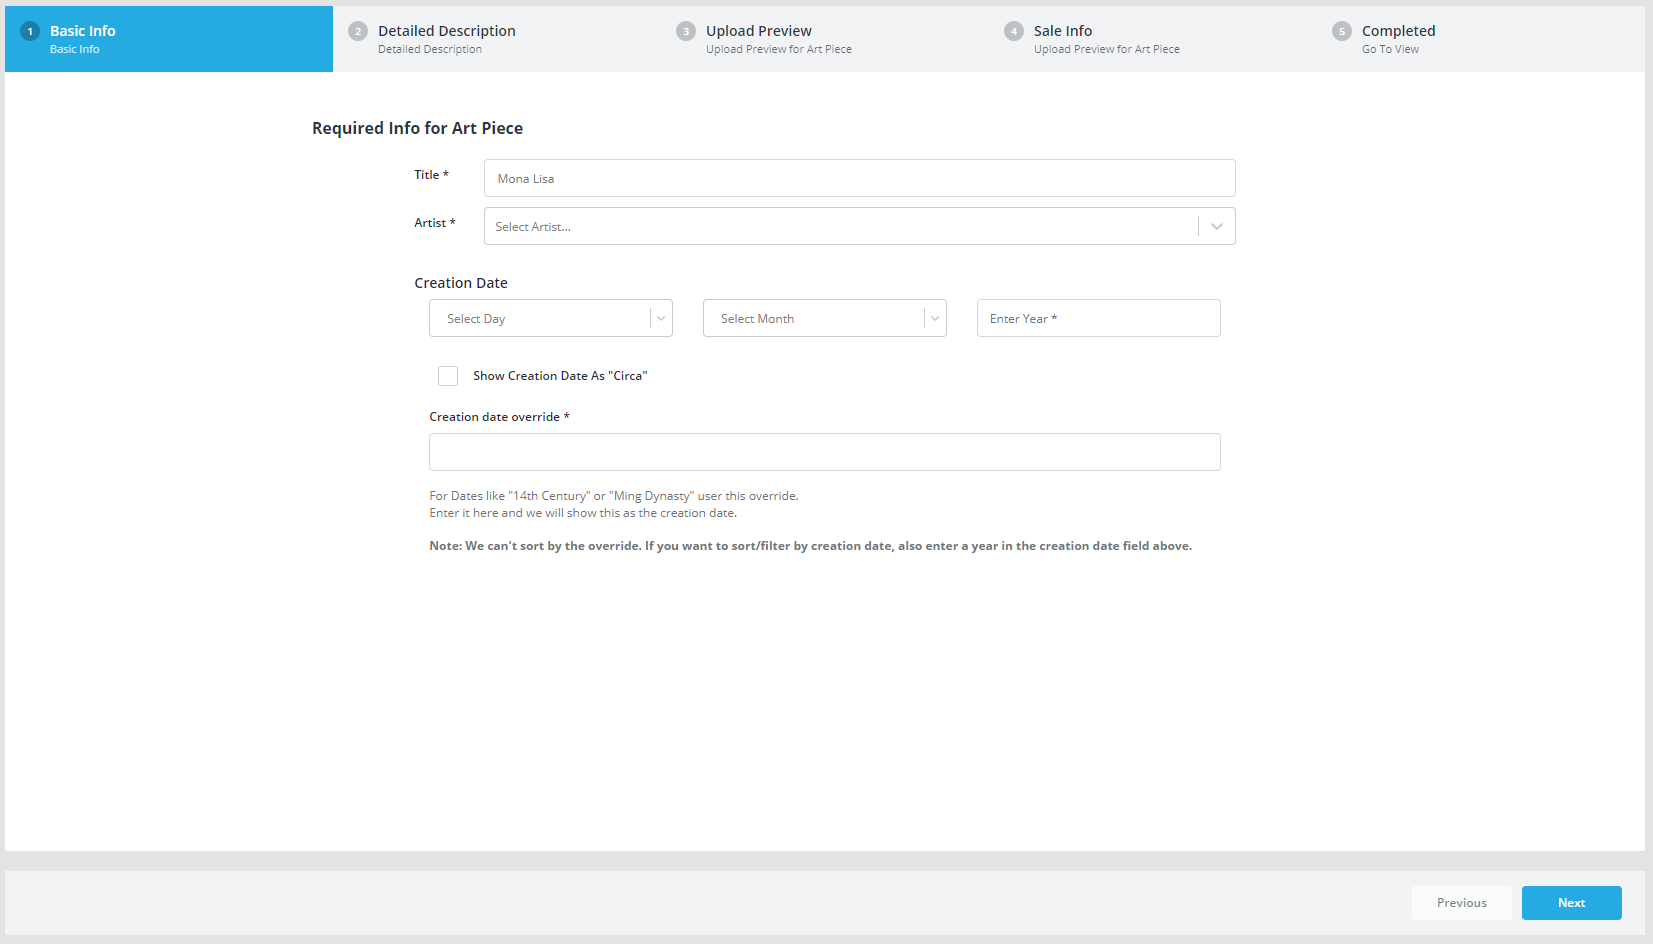
Enter basic information about the painting: title, artist and creation date.
In order to select an artist, their profile must first be created. If their profile isn't already in the database, please create one,
When entering the creation date, you can choose between two formats: day-month-year (in which case only the year is required in order to move onto the next step) and "circa". In the case of dates like "14th Century" or "Ming Dynasty", use the "circa" override.
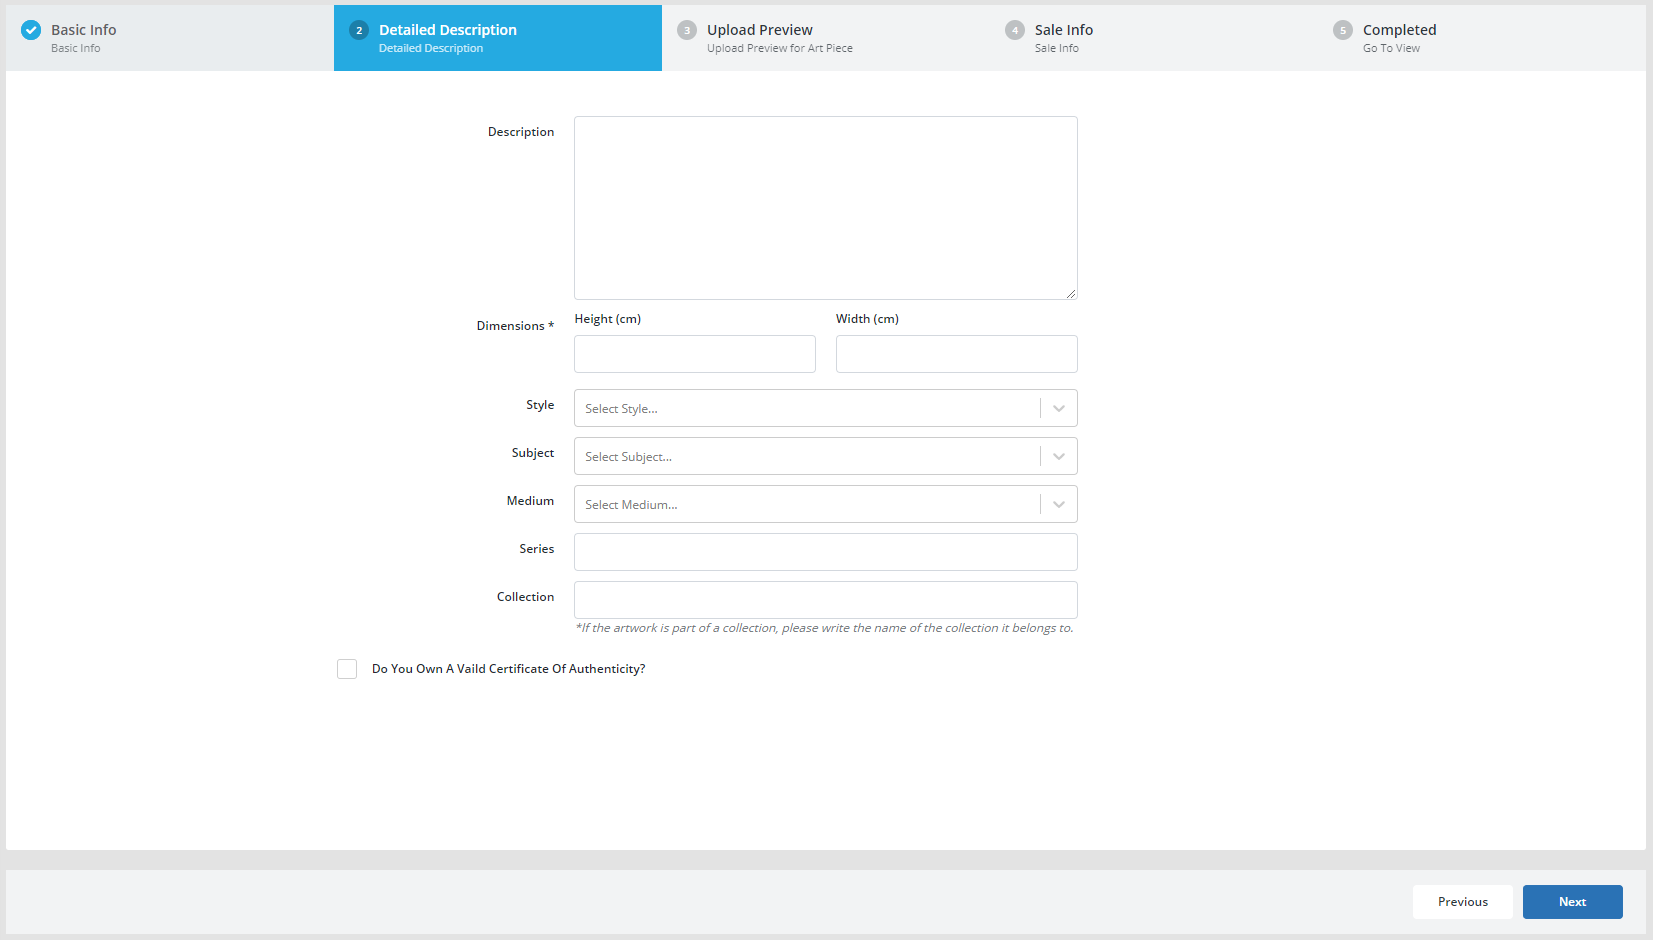
STEP 2
Next, enter more details about the painting: description, dimensions, style, subject, medium, series and collection.
Dimensions of the art piece are the only required information in this step, but we strongly advise that you add a description for all art pieces you create as that will enrich your exhibition. Of course, you may come back to this step later once the art piece is successfully created.
Enter dimensions as instructed: height x width in centimeters. It's important that this data is as accurate as possible because it will directly reflect the art piece's preview in virtual reality.
The style, subject and medium fields have some suggested options already entered, but to add your own just type the word or phrase you require and press 'enter' to confirm.
If the painting is part of a series or a collection, please add that information here as well.
If you own a valid Certificate of Authenticity for the art piece, please check the box and upload a scanned copy of the certificate.
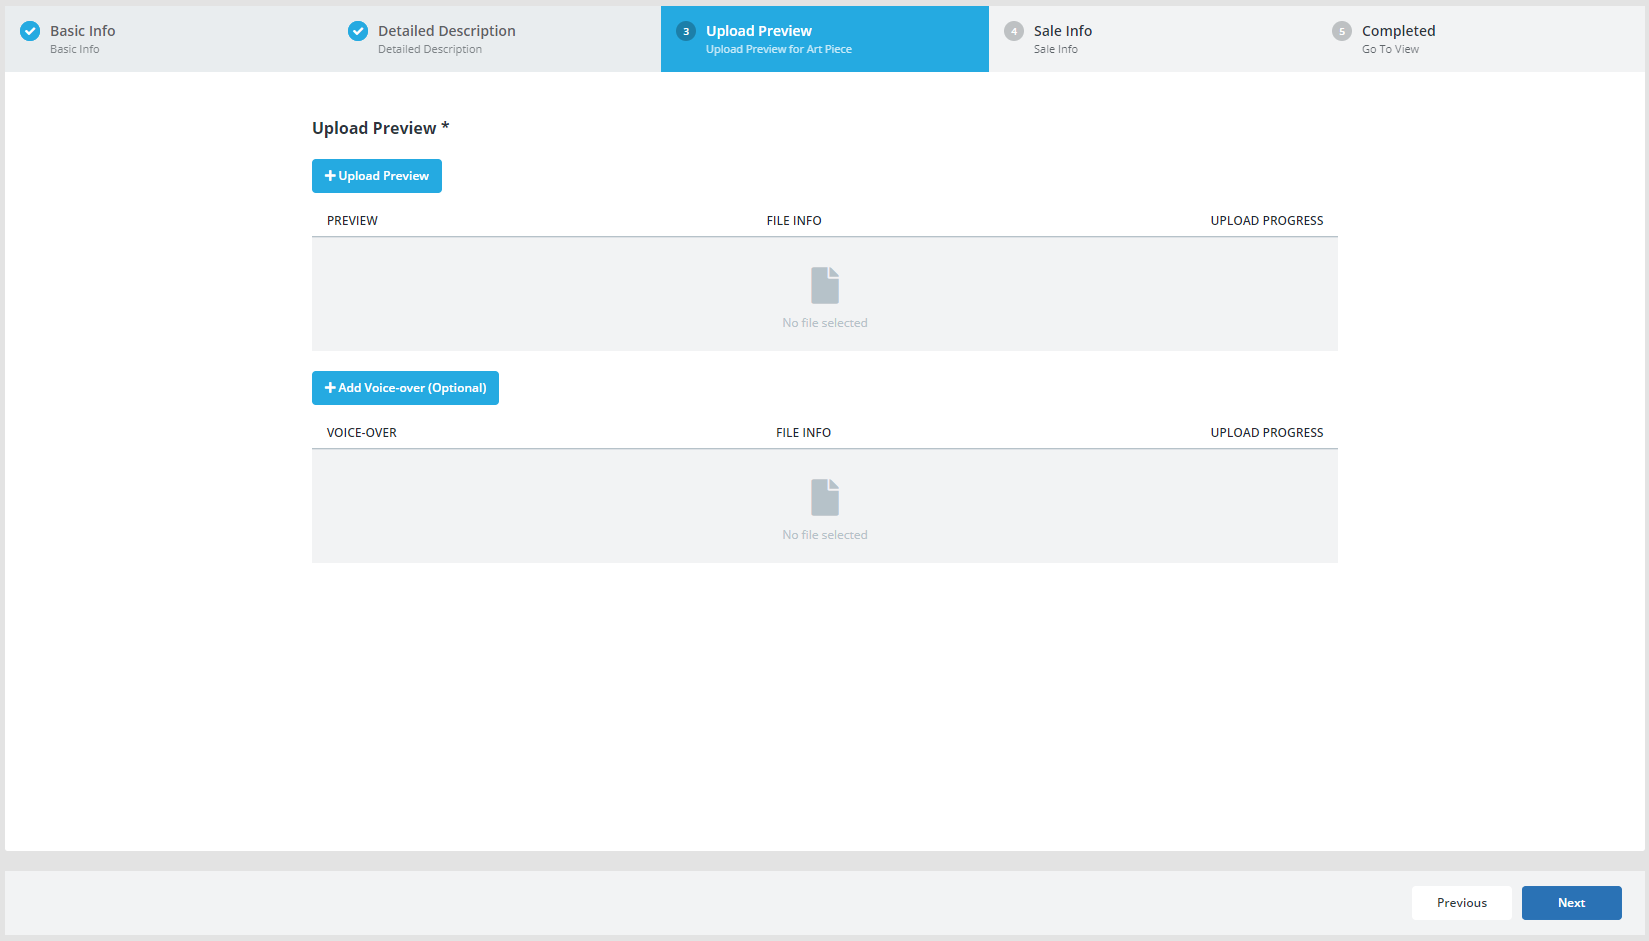
STEP 3
Upload the picture of the art piece.
Optionally, add a voice-over for the art piece; this feature will give your exhibition a new depth and provide your virtual visitors with an audio guide.
STEP 4
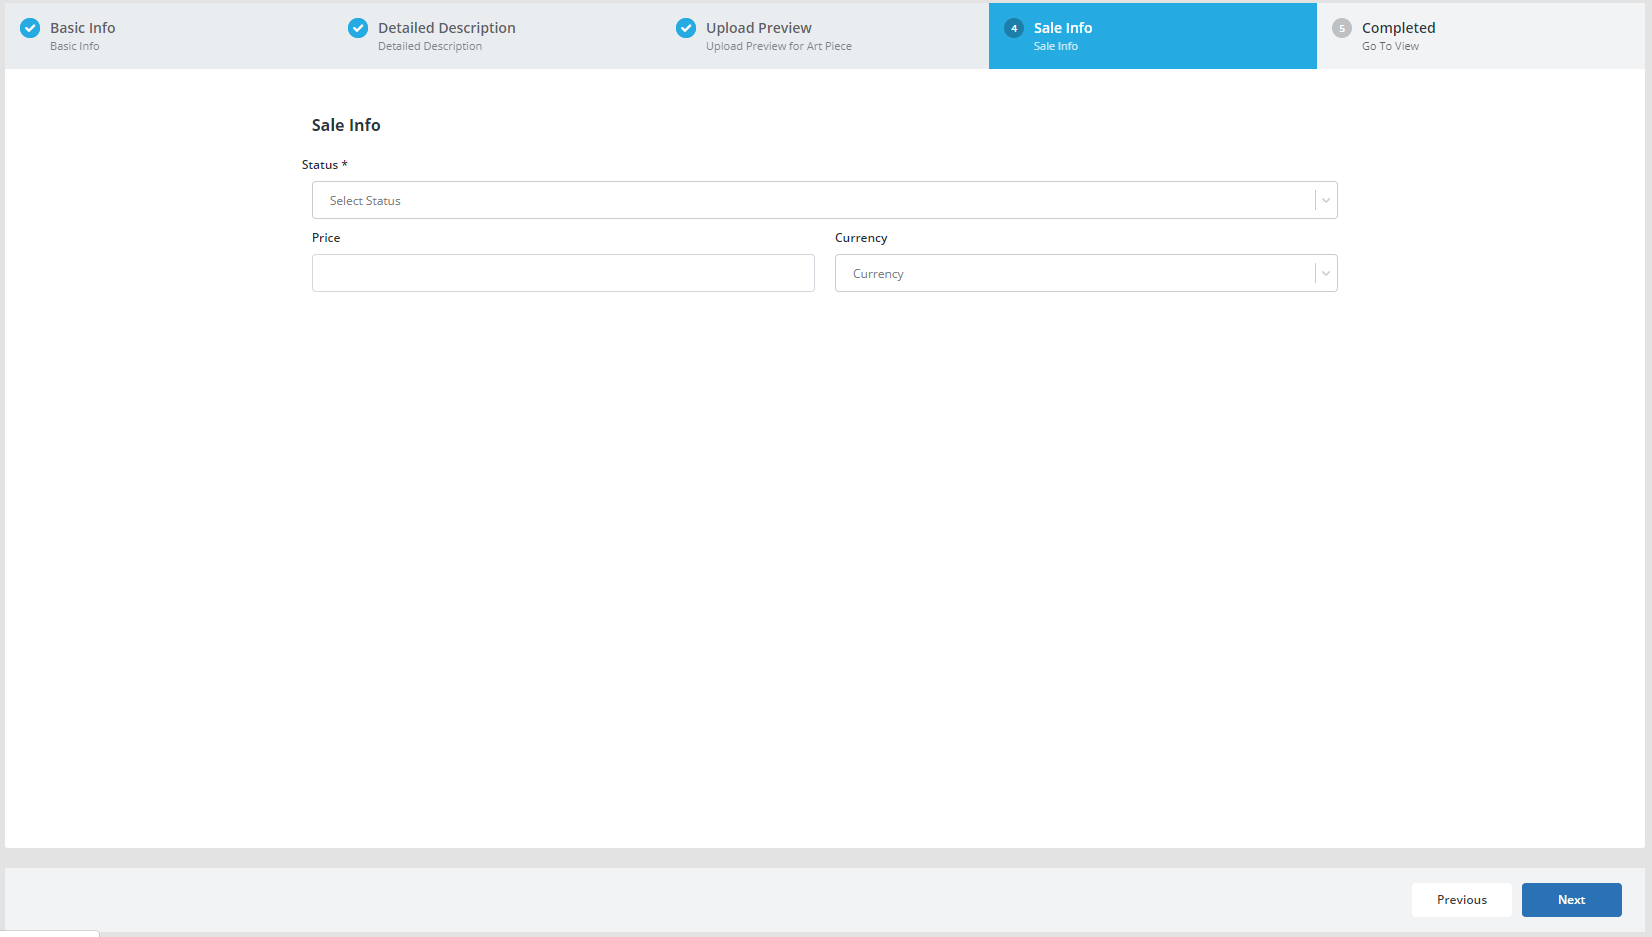
To select the status of the art piece, choose between the following options: online sale, on sale, not on sale, reserved, sold, on request, and donated.
If applicable, write the price of the art piece and select a currency.
STEP 5
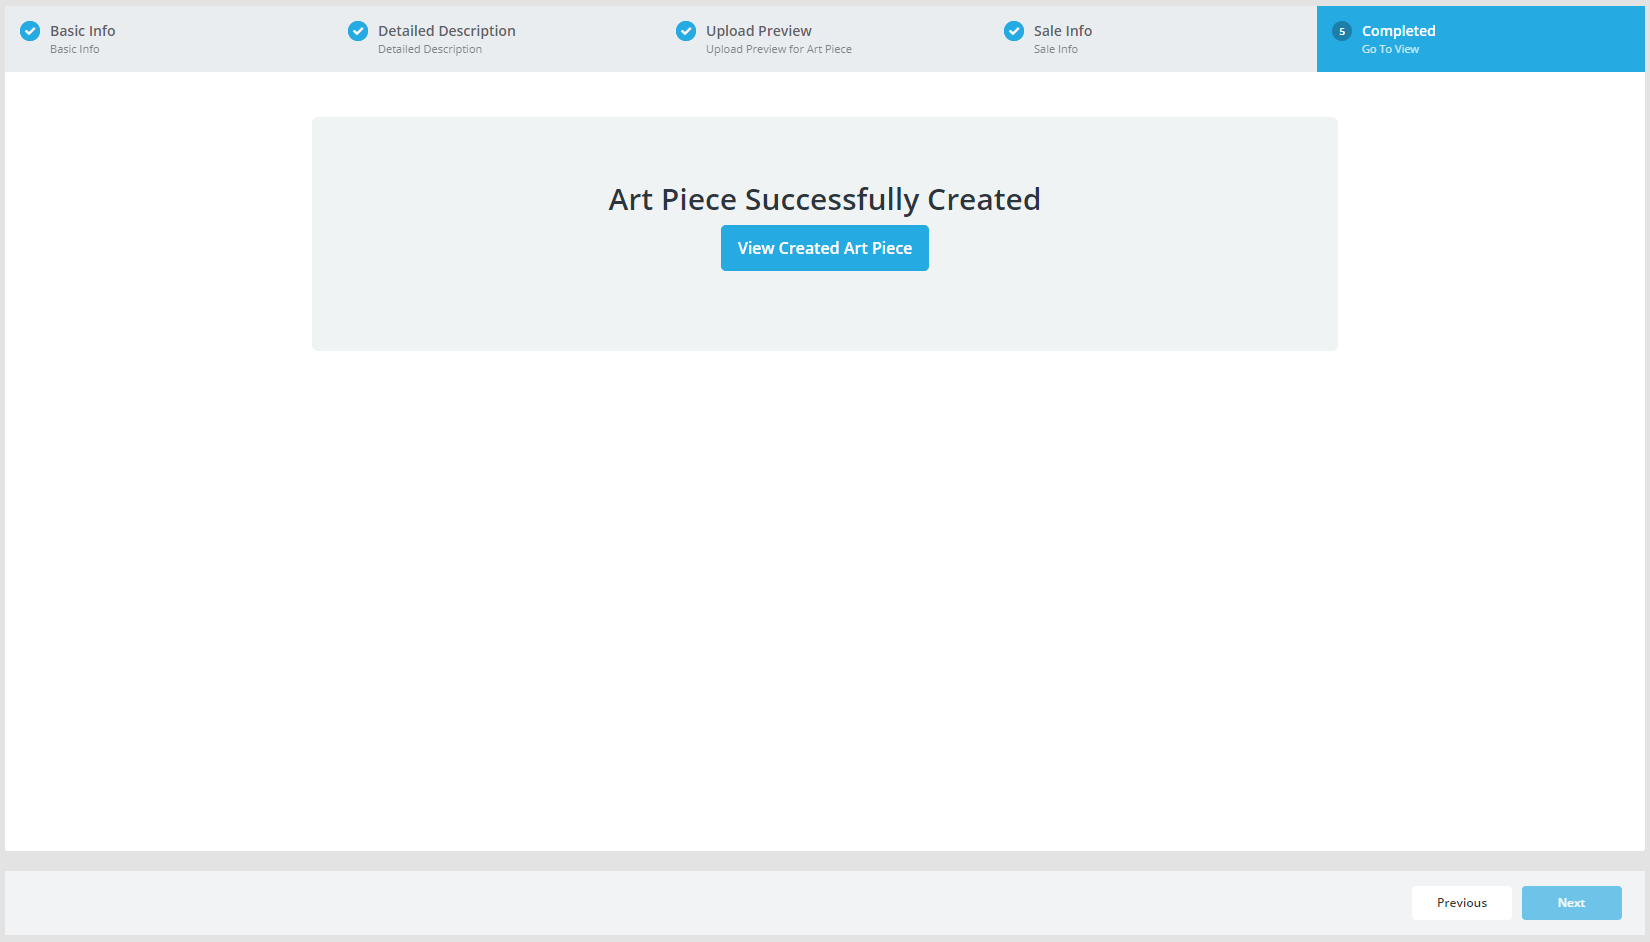
You have successfully created a new Art Piece.
Sculpture
To create a new Sculpture, follow these steps:
STEP 1
Enter basic information about the sculpture: title, artist and creation date.
In order to select an artist, their profile must first be created. If their profile isn't already in the database, please create one.
When entering the creation date, you can choose between two formats: day-month-year (in which case only the year is required in order to move onto the next step) and "circa". In the case of dates like "14th Century" or "Ming Dynasty", use the "circa" override.
STEP 2
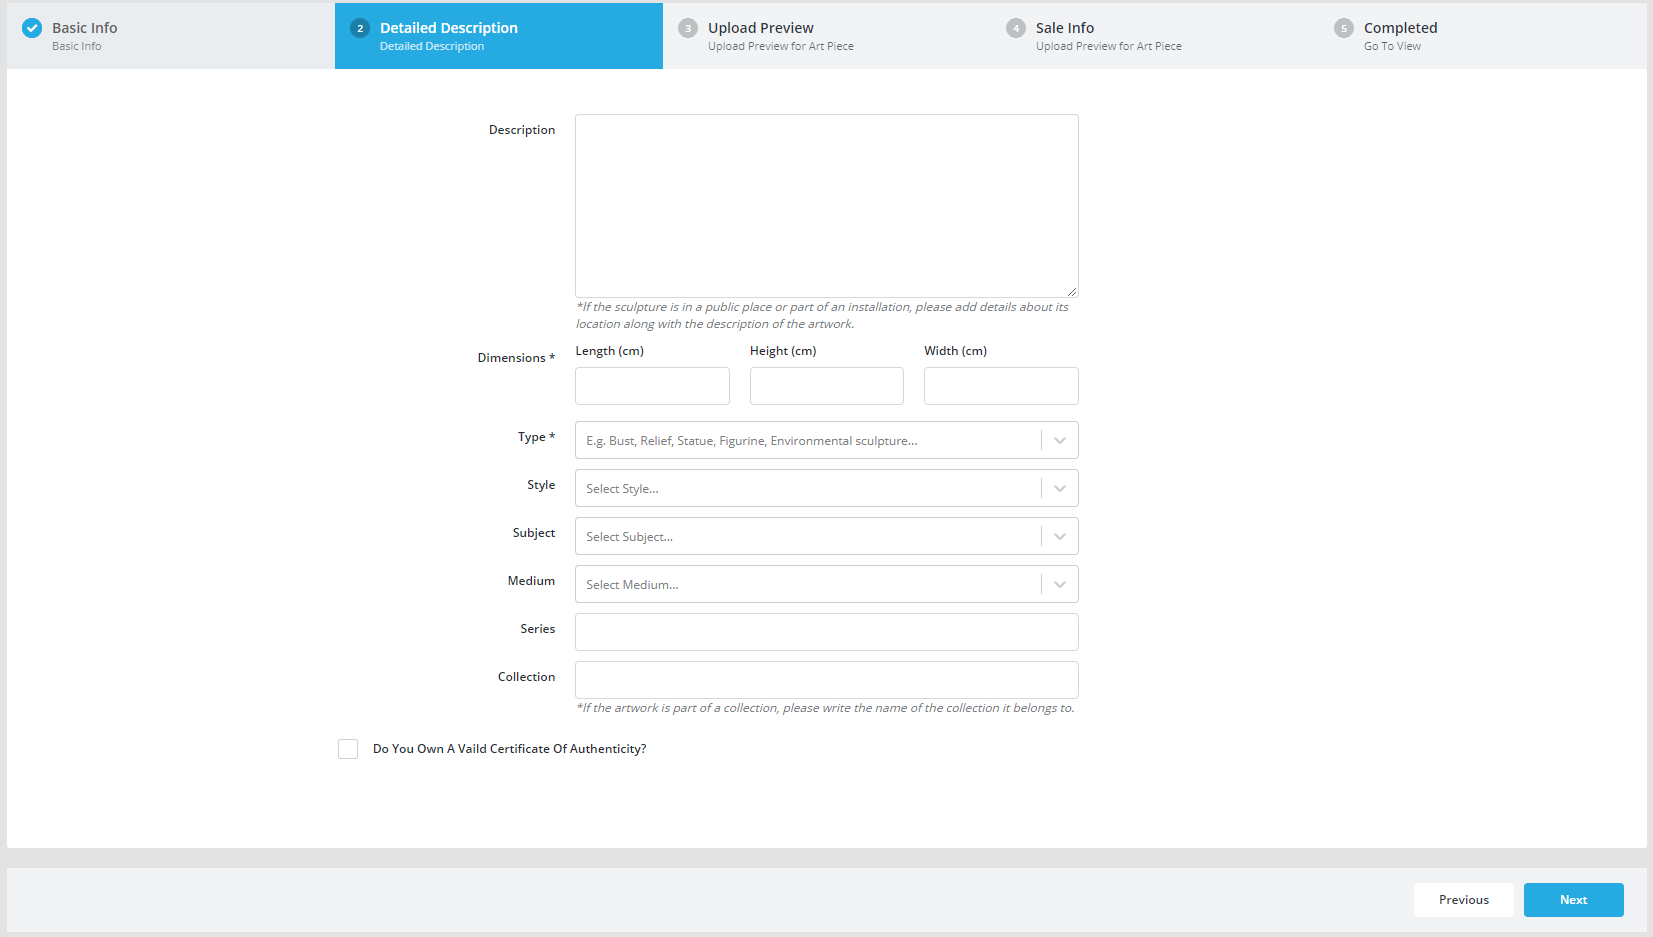
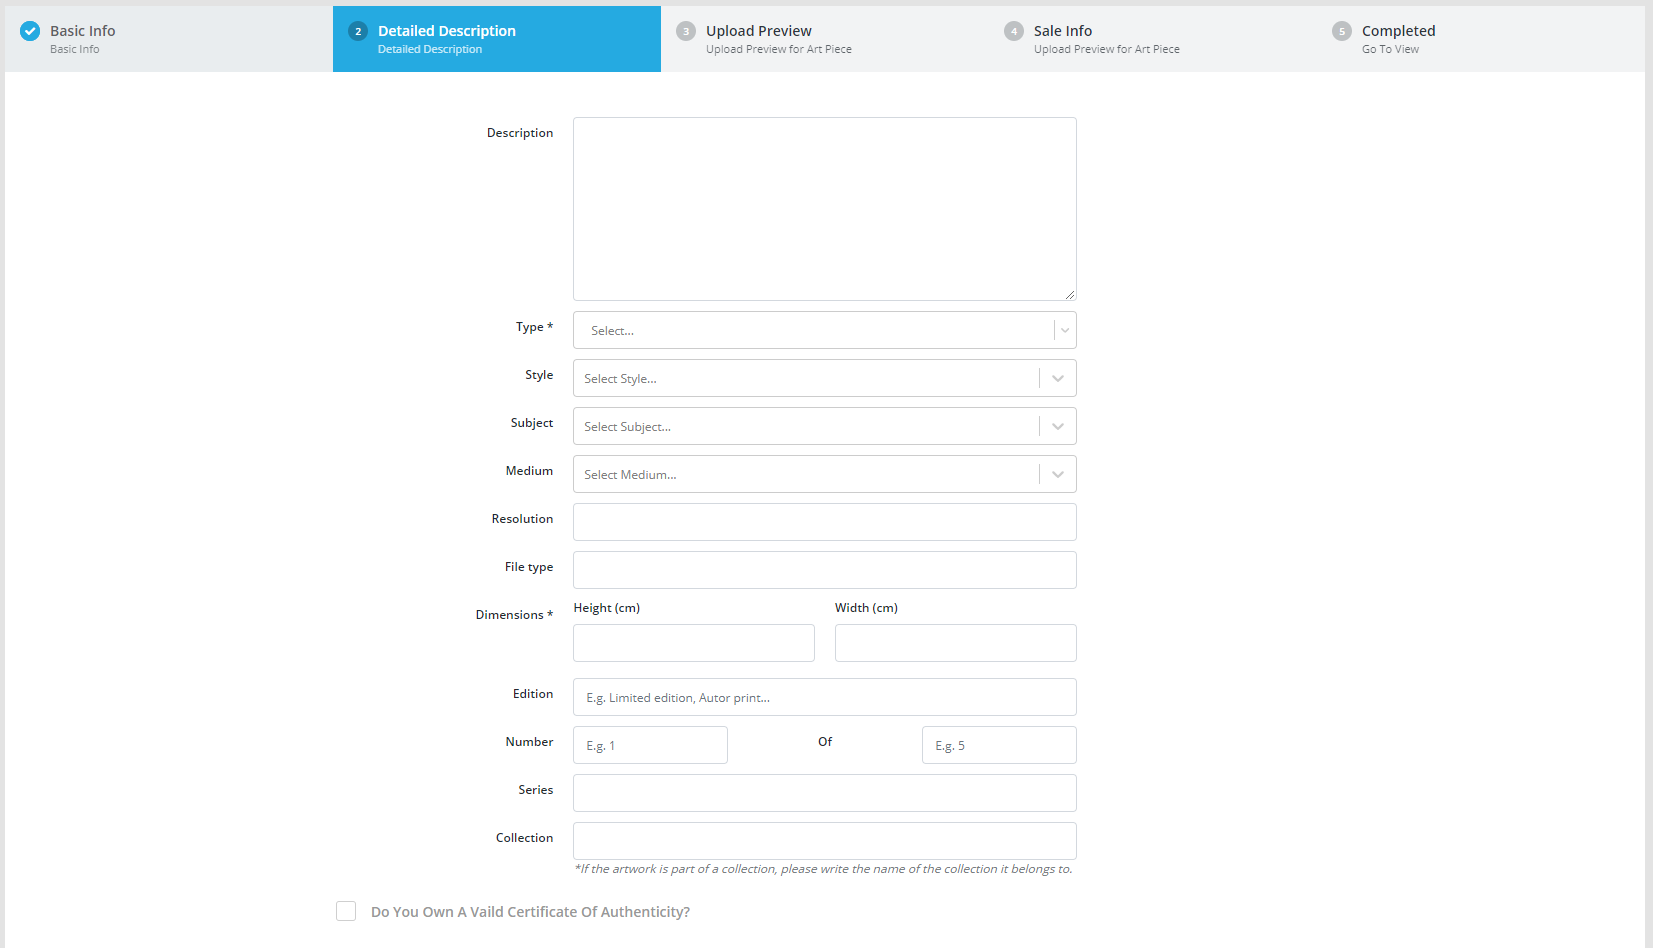
Next, enter more details about the sculpture: description, dimensions, type, style, subject, medium, series and collection.
Dimensions and type of the sculpture are the only required information in this step, but we strongly advise that you add a description for all art pieces you create as that will enrich your exhibition. Of course, you may come back to this step later once the art piece is successfully created.
Enter dimensions as instructed: length x height x width in centimeters. It's important that this data is as accurate as possible because it will directly reflect the art piece's preview in virtual reality.
Add what type of sculpture the art piece is. You can choose between already inputted types or add a new type by simply writing the word or phrase and pressing 'enter' to confirm.
Likewise, the style, subject and medium fields have some suggested options already entered, but you can also add your own following the same principle.
If the painting is part of a series or a collection, please add that information here as well.
If you own a valid Certificate of Authenticity for the art piece, please check the box and upload a scanned copy of the certificate.
STEP 3
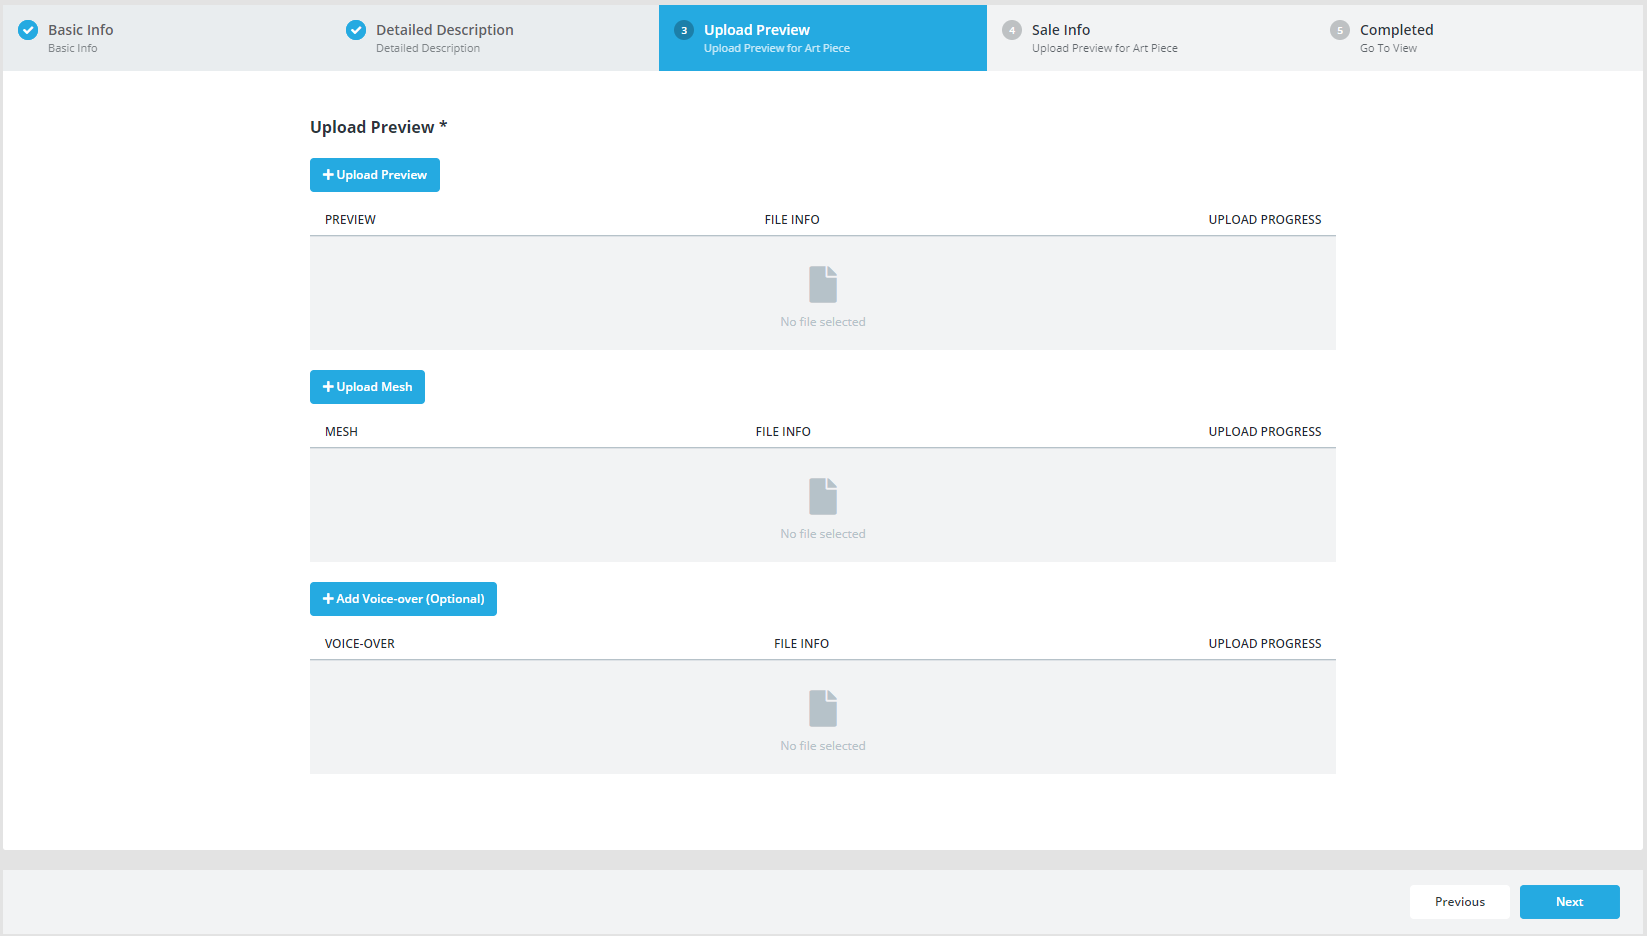
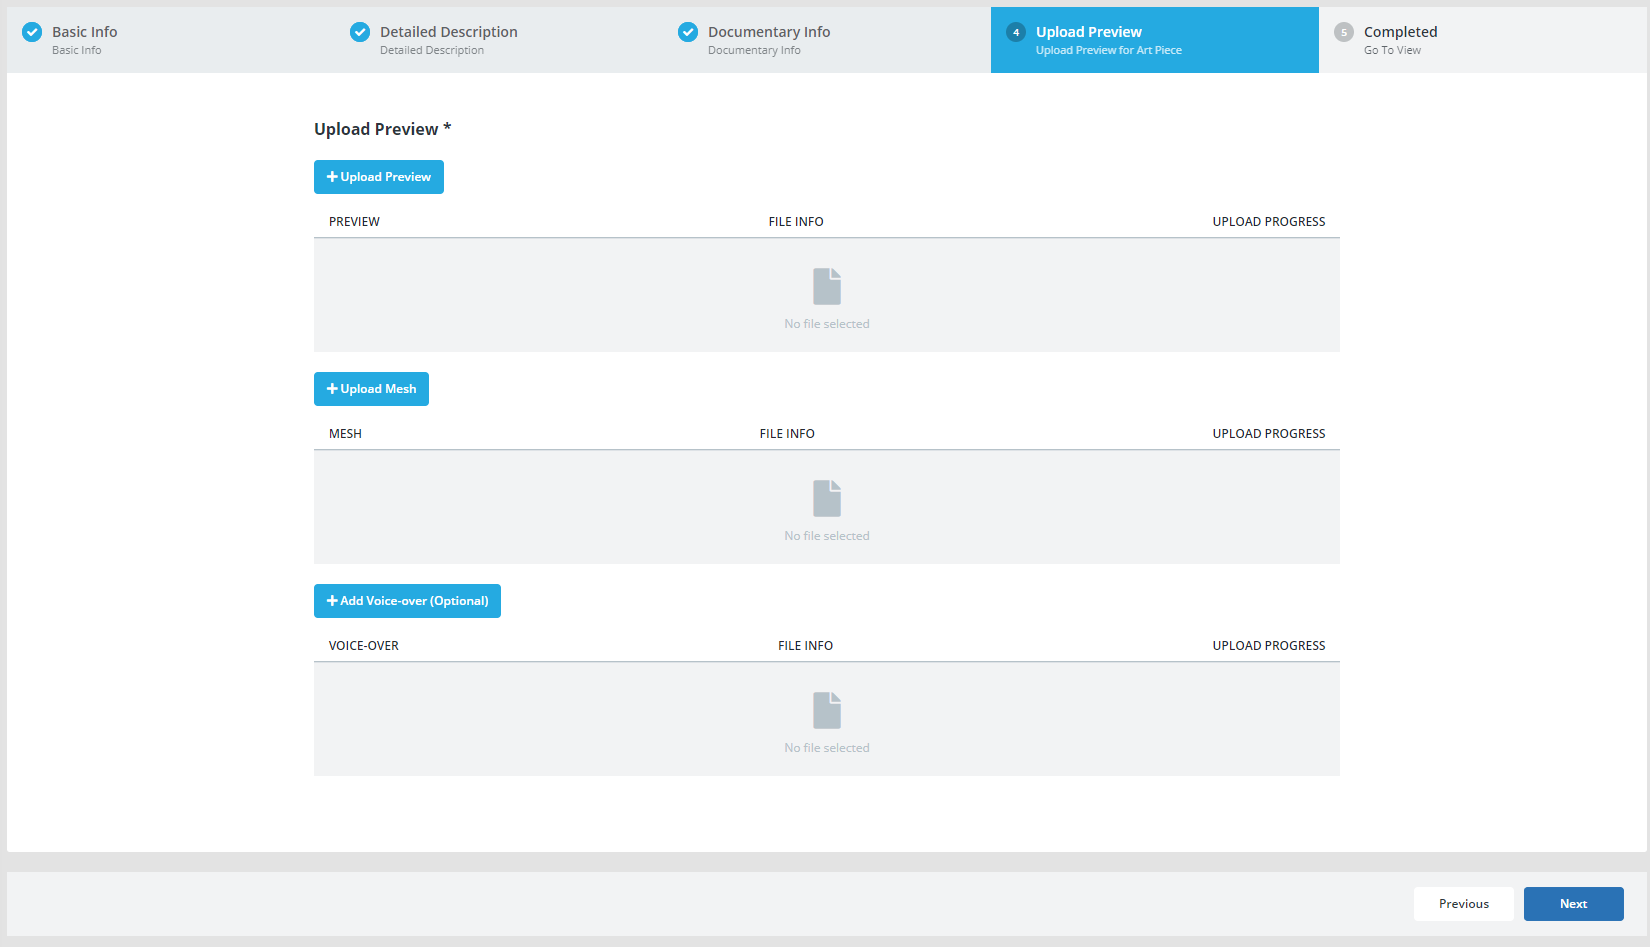
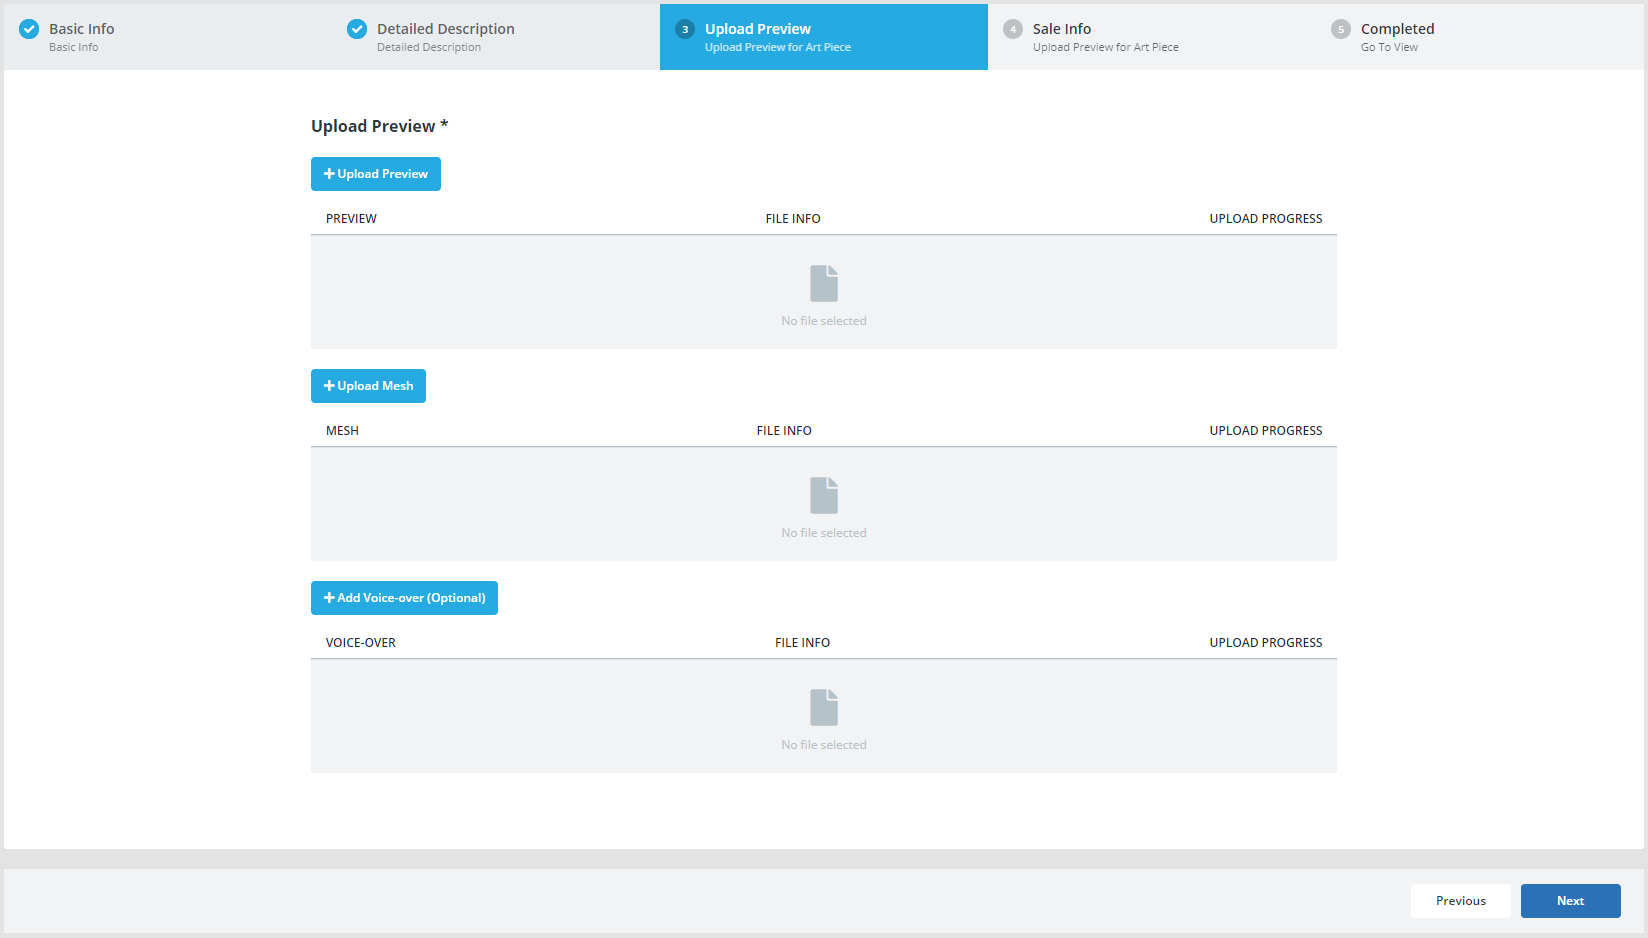
Upload the picture of the art piece for preview. Likewise, upload the 3D object (mesh file format).
Optionally, add a voice-over for the art piece; this feature will give your exhibition a new depth and provide your virtual visitors with an audio guide.
STEP 4
To select the status of the art piece, choose between the following options: online sale, on sale, not on sale, reserved, sold, on request, and donated.
If applicable, write the price of the art piece and select a currency.
STEP 5
You have successfully created a new Art Piece.
Drawing
To create a new Drawing, follow these steps:
STEP 1
Enter basic information about the drawing: title, artist and creation date.
In order to select an artist, their profile must first be created. If their profile isn't already in the database, please create one,
When entering the creation date, you can choose between two formats: day-month-year (in which case only the year is required in order to move onto the next step) and "circa". In the case of dates like "14th Century" or "Ming Dynasty", use the "circa" override.
STEP 2
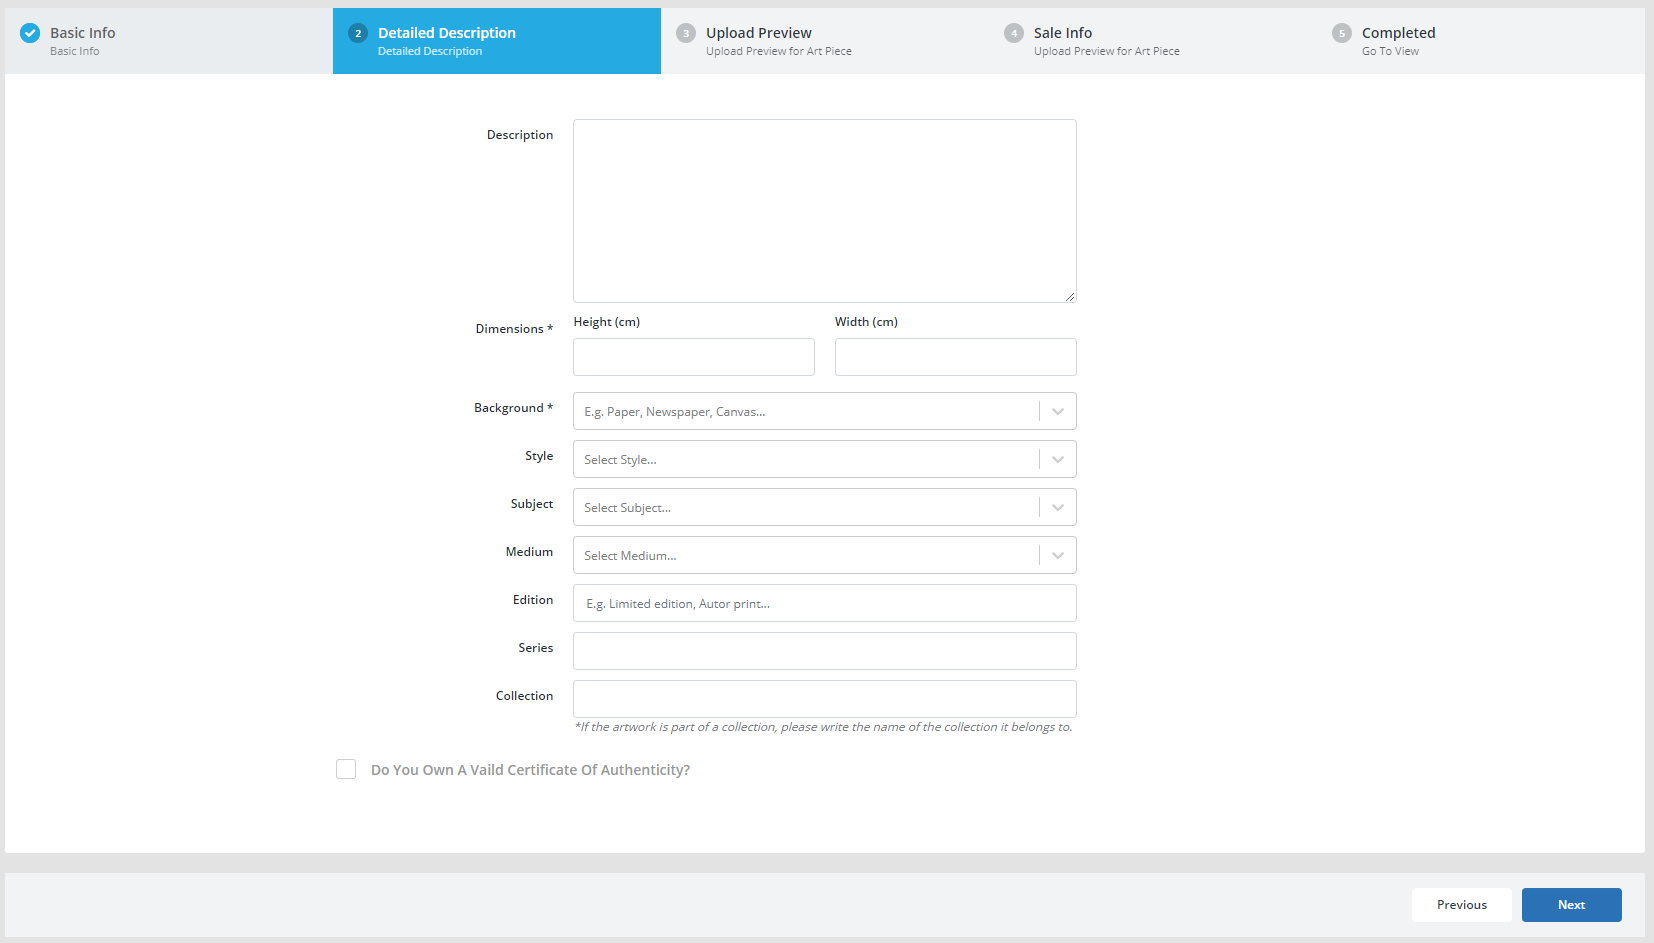
Next, enter more details about the drawing: description, dimensions, background, style, subject, medium, edition, series and collection.
Dimensions and background of the drawing are the only required information in this step, but we strongly advise that you add a description for all art pieces you create as that will enrich your exhibition. Of course, you may come back to this step later once the art piece is successfully created.
Enter dimensions as instructed: height x width in centimeters. It's important that this data is as accurate as possible because it will directly reflect the art piece's preview in virtual reality.
Add what type of background the art piece has (e.g. paper). You can choose between already inputted types of background or add a new type by simply writing the word or phrase and pressing 'enter' to confirm.
Likewise, the style, subject and medium fields have some suggested options already entered, but you can also add your own following the same principle.
If the drawing is part of an edition, series, or a collection, please add that information here as well.
If you own a valid Certificate of Authenticity for the art piece, please check the box and upload a scanned copy of the certificate.
STEP 3
Upload the picture of the art piece.
Optionally, add a voice-over for the art piece; this feature will give your exhibition a new depth and provide your virtual visitors with an audio guide.
STEP 4
To select the status of the art piece, choose between the following options: online sale, on sale, not on sale, reserved, sold, on request, and donated.
If applicable, write the price of the art piece and select a currency.
STEP 5
You have successfully created a new Art Piece.
To create a new Print, follow these steps:
STEP 1
Enter basic information about the print: title, artist and creation date.
In order to select an artist, their profile must first be created. If their profile isn't already in the database, please create one,
When entering the creation date, you can choose between two formats: day-month-year (in which case only the year is required in order to move onto the next step) and "circa". In the case of dates like "14th Century" or "Ming Dynasty", use the "circa" override.
STEP 2
Next, enter more details about the print: description, dimensions, style, subject, medium, edition, series and collection.
Dimensions and medium of the print are the only required information in this step, but we strongly advise that you add a description for all art pieces you create as that will enrich your exhibition. Of course, you may come back to this step later once the art piece is successfully created.
Enter dimensions as instructed: height x width in centimeters. It's important that this data is as accurate as possible because it will directly reflect the art piece's preview in virtual reality.
The style, subject and medium fields have some suggested options already entered, but to add your own just type the word or phrase you require and press 'enter' to confirm.
If the print is part of an edition, series, or a collection, please add that information here as well.
If you own a valid Certificate of Authenticity for the art piece, please check the box and upload a scanned copy of the certificate.
STEP 3
Upload the picture of the art piece.
Optionally, add a voice-over for the art piece; this feature will give your exhibition a new depth and provide your virtual visitors with an audio guide.
STEP 4
To select the status of the art piece, choose between the following options: online sale, on sale, not on sale, reserved, sold, on request, and donated.
If applicable, write the price of the art piece and select a currency.
STEP 5
You have successfully created a new Art Piece.
Photography
To create a new Photograph, follow these steps:
STEP 1
Enter basic information about the photograph: title, artist and creation date.
In order to select an artist, their profile must first be created. If their profile isn't already in the database, please create one,
When entering the creation date, you can choose between two formats: day-month-year (in which case only the year is required in order to move onto the next step) and "circa". In the case of dates like "14th Century" or "Ming Dynasty", use the "circa" override.
STEP 2
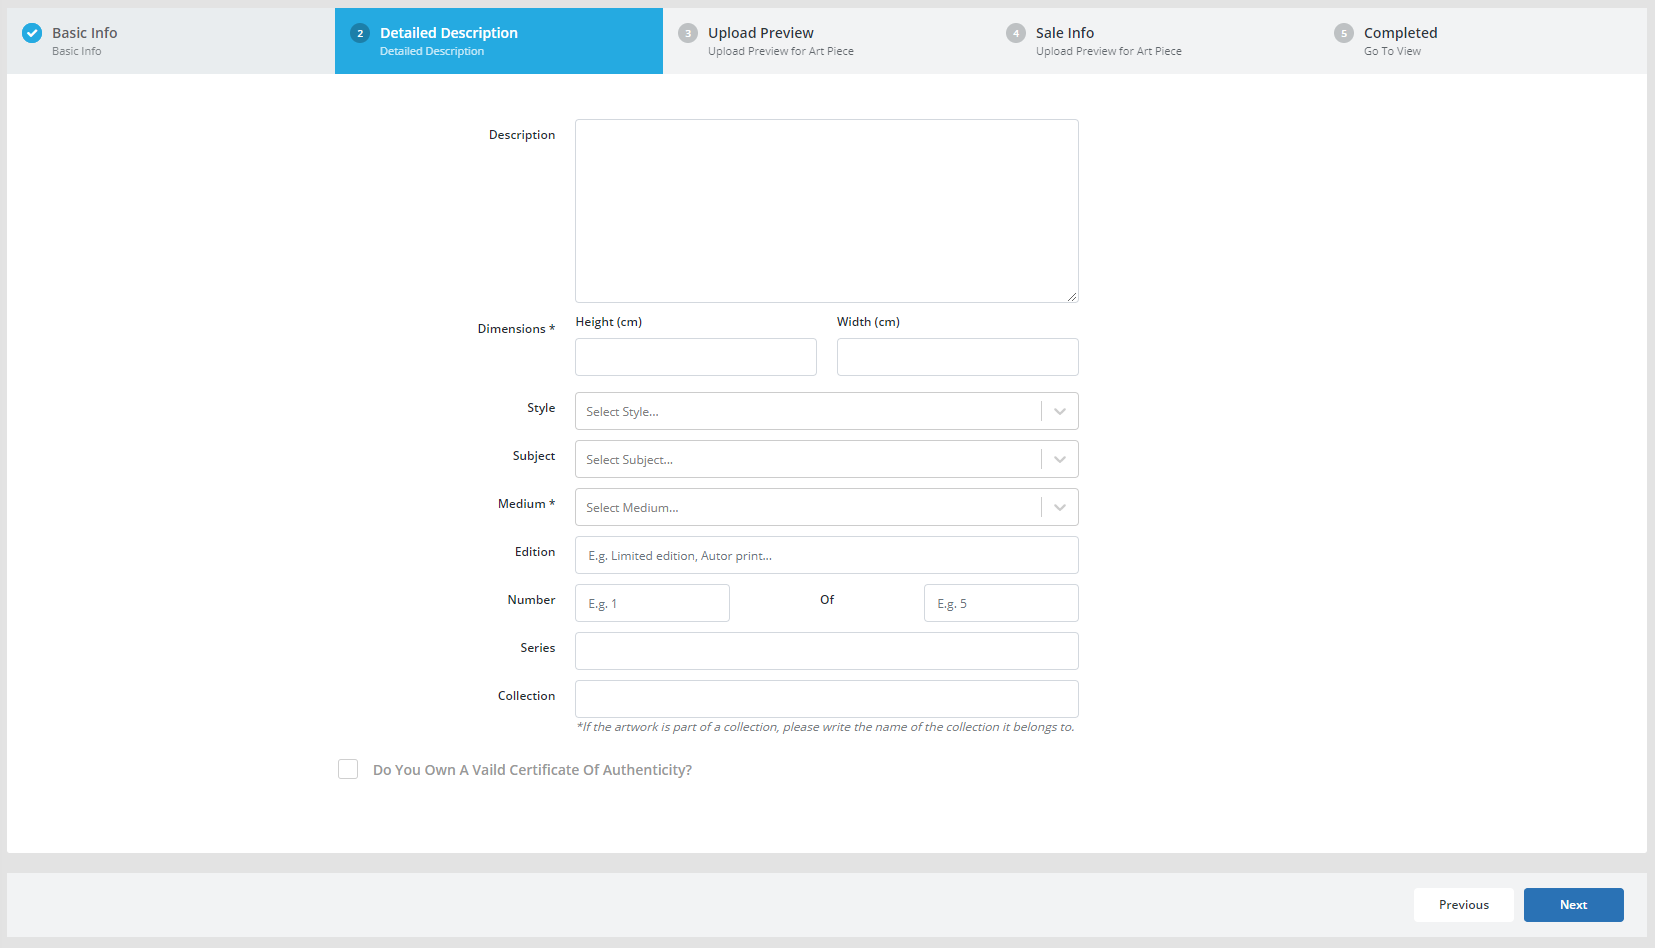
Next, enter more details about the photograph: description, type, style, subject, medium, resolution, file type, dimensions, edition, series and collection.
Dimensions and Type of the photograph are the only required information in this step, but we strongly advise that you add a description for all art pieces you create as that will enrich your exhibition. Of course, you may come back to this step later once the art piece is successfully created.
Chose what type of photograph your art piece is: Analogue or Digital.
The style, subject and medium fields have some suggested options already entered, but to add your own just type the word or phrase you require and press 'enter' to confirm.
Write down the resolution of your photograph (e.g. 5000 x 4000).
Enter file type of your art piece (e.g. PNG).
Enter dimensions as instructed: height x width in centimeters. It's important that this data is as accurate as possible because it will directly reflect the art piece's preview in virtual reality.
If the photograph is part of an edition, series, or a collection, please add that information here as well.
If you own a valid Certificate of Authenticity for the art piece, please check the box and upload a scanned copy of the certificate.
STEP 3
Upload the art piece.
Optionally, add a voice-over for the art piece; this feature will give your exhibition a new depth and provide your virtual visitors with an audio guide.
STEP 4
To select the status of the art piece, choose between the following options: online sale, on sale, not on sale, reserved, sold, on request, and donated.
If applicable, write the price of the art piece and select a currency.
STEP 5
You have successfully created a new Art Piece.
Video
To create a new Video, follow these steps:
STEP 1
Enter basic information about the video: title, artist and creation date.
In order to select an artist, their profile must first be created. If their profile isn't already in the database, please create one,
When entering the creation date, you can choose between two formats: day-month-year (in which case only the year is required in order to move onto the next step) and "circa". In the case of dates like "14th Century" or "Ming Dynasty", use the "circa" override.
STEP 2
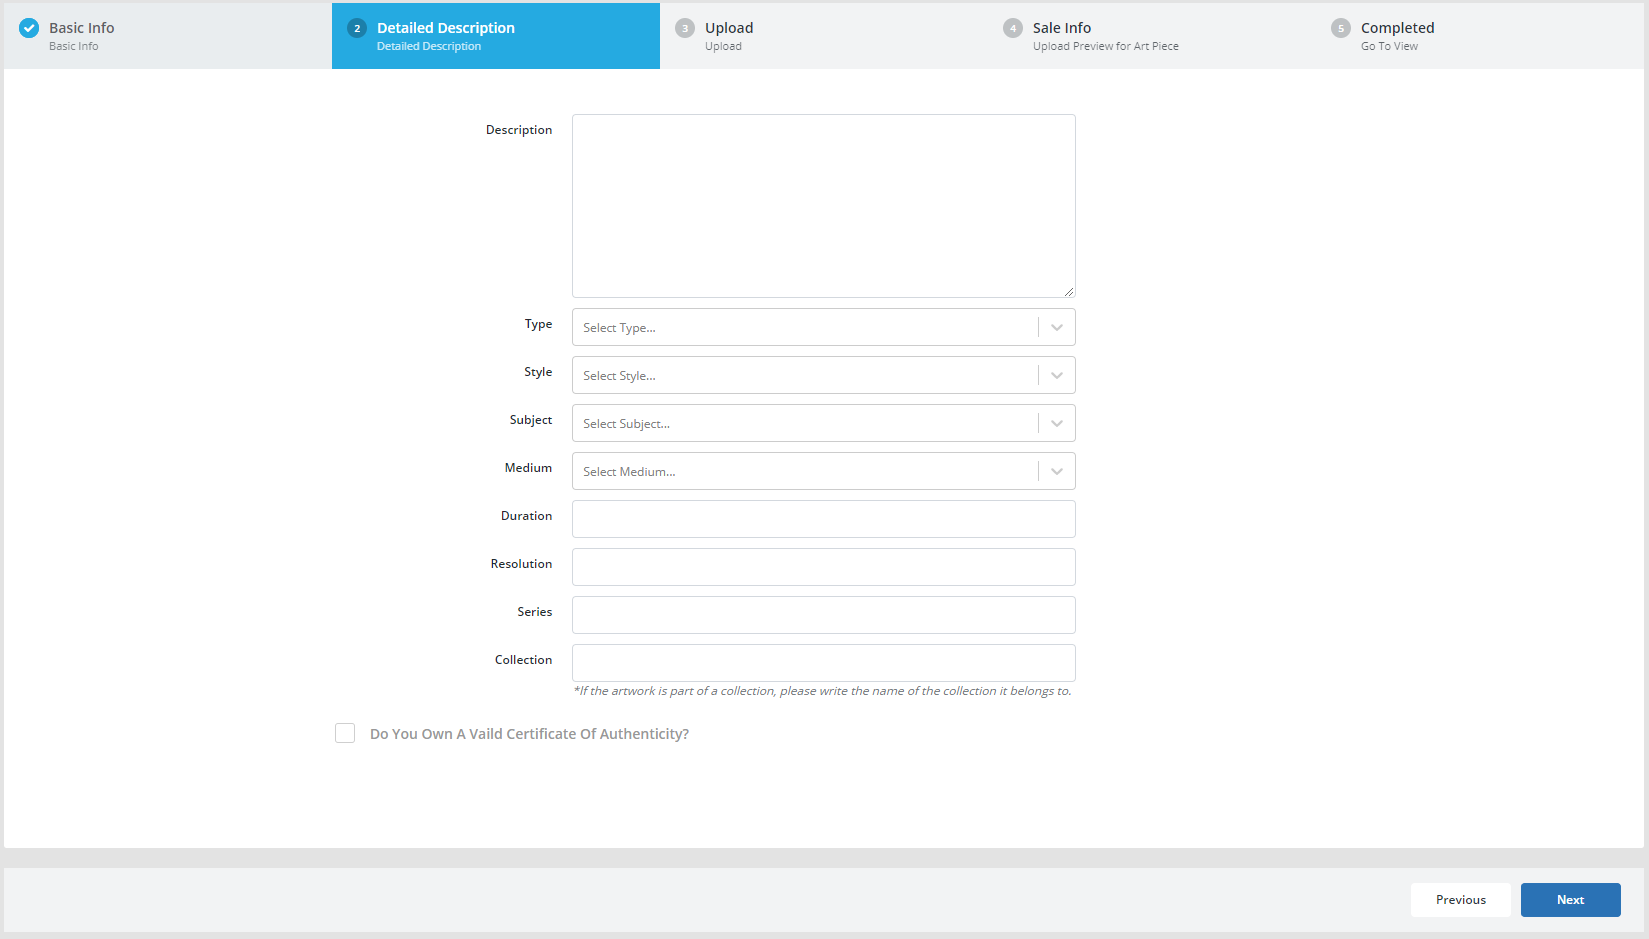
Next, enter more details about the video: description, type, style, subject, medium, duration, resolution, file type, dimensions, series and collection.
Type and Duration of the video are the only required information in this step, but we strongly advise that you add a description for all art pieces you create as that will enrich your exhibition. Of course, you may come back to this step later once the art piece is successfully created.
Add what type of video your art piece is (e.g. documentary). You can choose between already inputted types of video or add a new type by simply writing the word or phrase and pressing 'enter' to confirm.
Likewise, the style, subject and medium fields have some suggested options already entered, but you can also add your own following the same principle.
Write down the duration of the video (e.g. 10 minutes) and the resolution (e.g. 1920 x 800).
If the video is part of a series or a collection, please add that information here as well.
If you own a valid Certificate of Authenticity for the art piece, please check the box and upload a scanned copy of the certificate.
STEP 3
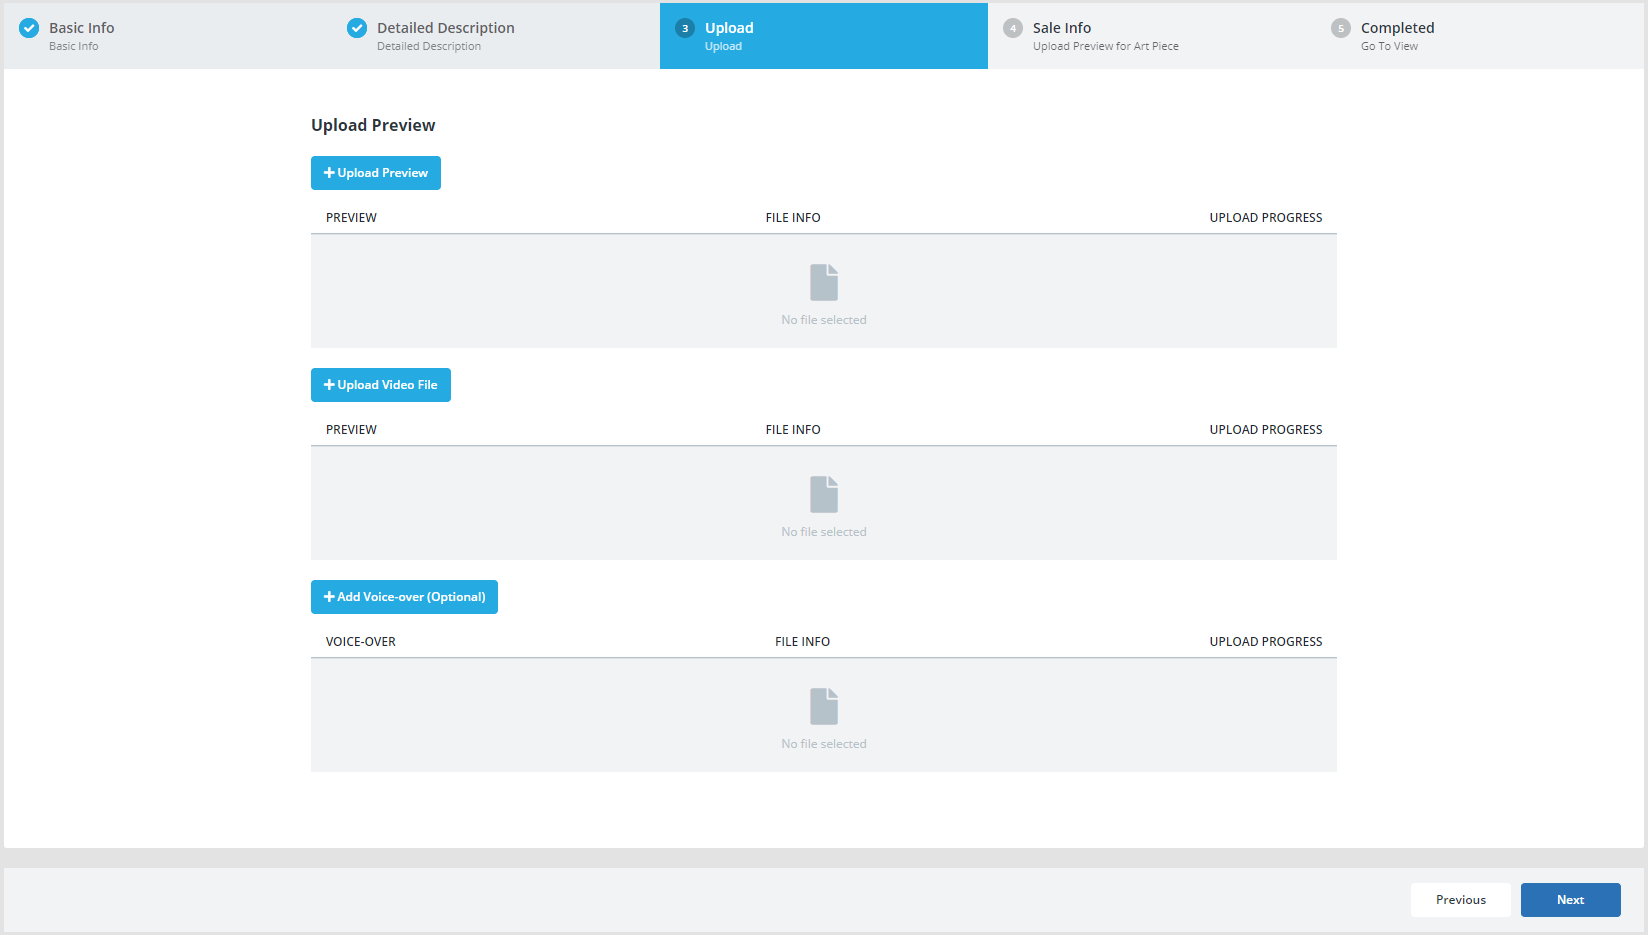
Upload a picture as a preview for the video (thumbnail), not larger than 10 MB. Likewise, upload the video itself.
Optionally, add a voice-over for the art piece; this feature will give your exhibition a new depth and provide your virtual visitors with an audio guide.
STEP 4
To select the status of the art piece, choose between the following options: online sale, on sale, not on sale, reserved, sold, on request, and donated.
If applicable, write the price of the art piece and select a currency.
STEP 5
You have successfully created a new Art Piece.
Street Art
To create a new Street Art piece, follow these steps:
STEP 1
Enter basic information about the art piece: title, artist and creation date.
In order to select an artist, their profile must first be created. If their profile isn't already in the database, please create one,
When entering the creation date, you can choose between two formats: day-month-year (in which case only the year is required in order to move onto the next step) and "circa". In the case of dates like "14th Century" or "Ming Dynasty", use the "circa" override.
STEP 2
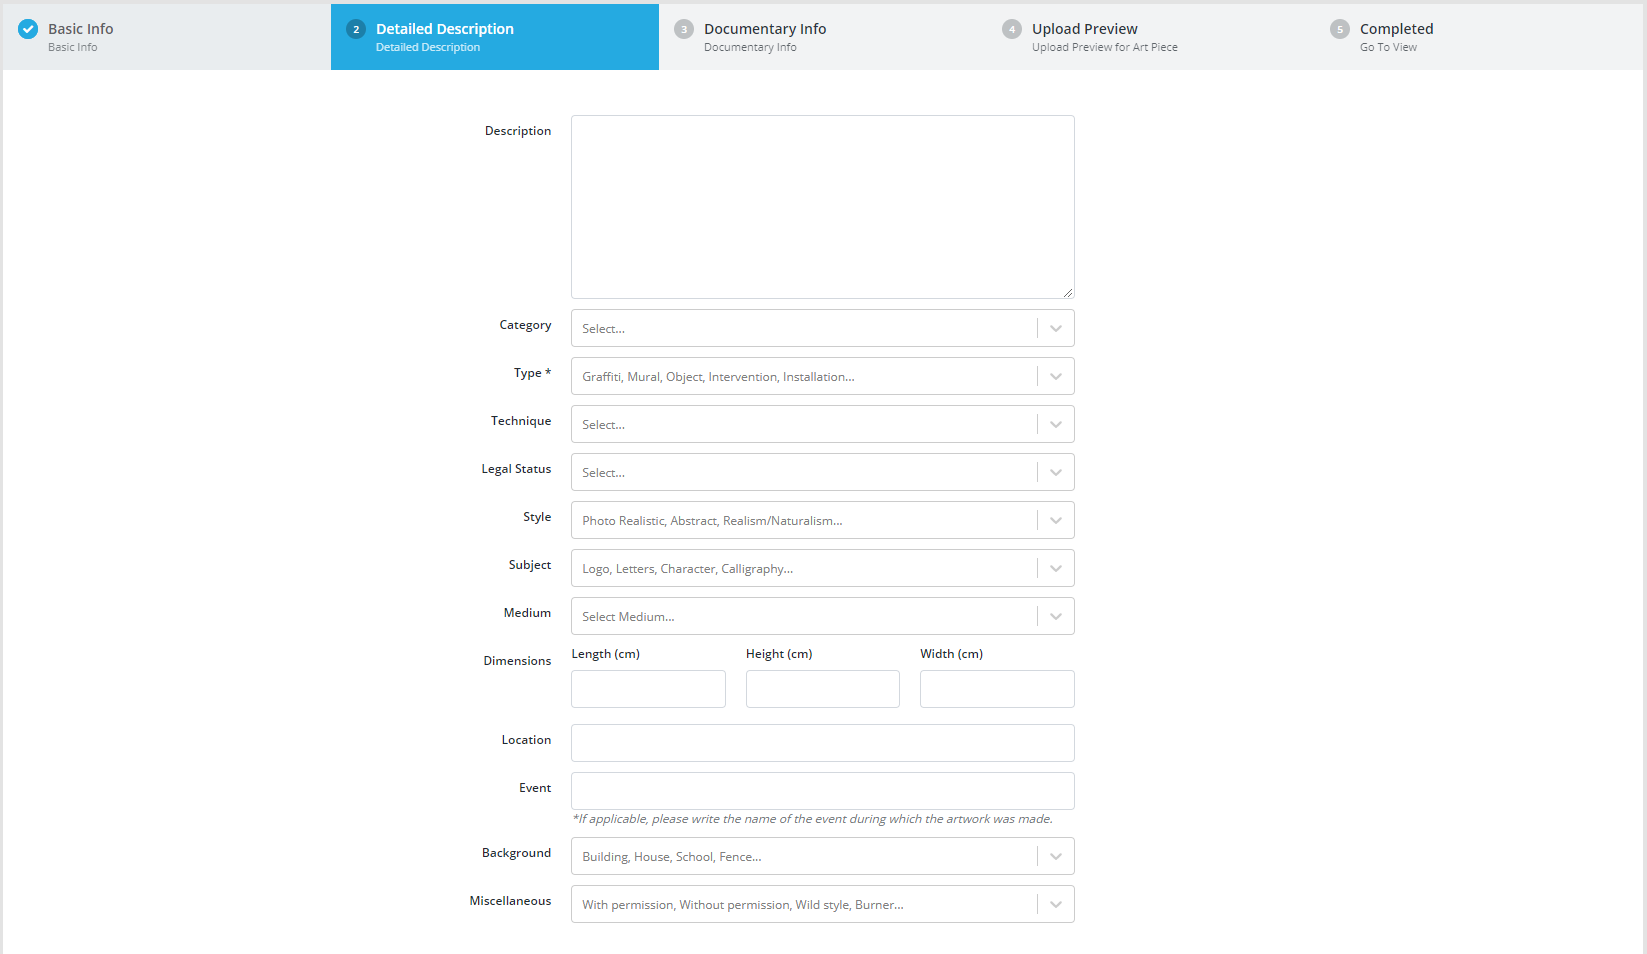
Next, enter more details about the video: description, category, type, technique, legal status, style, subject, medium, dimensions, location, event, background and miscellaneous information.
Select the type of your art piece from the suggested options (e.g. mural, graffiti...) or add a new type by simply writing the word or phrase and pressing 'enter' to confirm. This is the only required information in step 2, but we strongly advise that you add a description for all art pieces you create as that will enrich your exhibition. Of course, you may come back to this step later once the art piece is successfully created.
Provide information about the technique used and the legal status of the art piece following the same principle.
Likewise, the style, subject and medium fields have some suggested options already entered, but you can also add your own.
Enter dimensions as instructed: length x height x width in centimeters. It's important that this data is as accurate as possible because it will directly reflect the art piece's preview in virtual reality.
Write down the location of the art piece and, if applicable, the name of the event during which it was made.
Select or add the background on which the art piece was created and enter any miscellaneous information about the piece if needed.
STEP 3
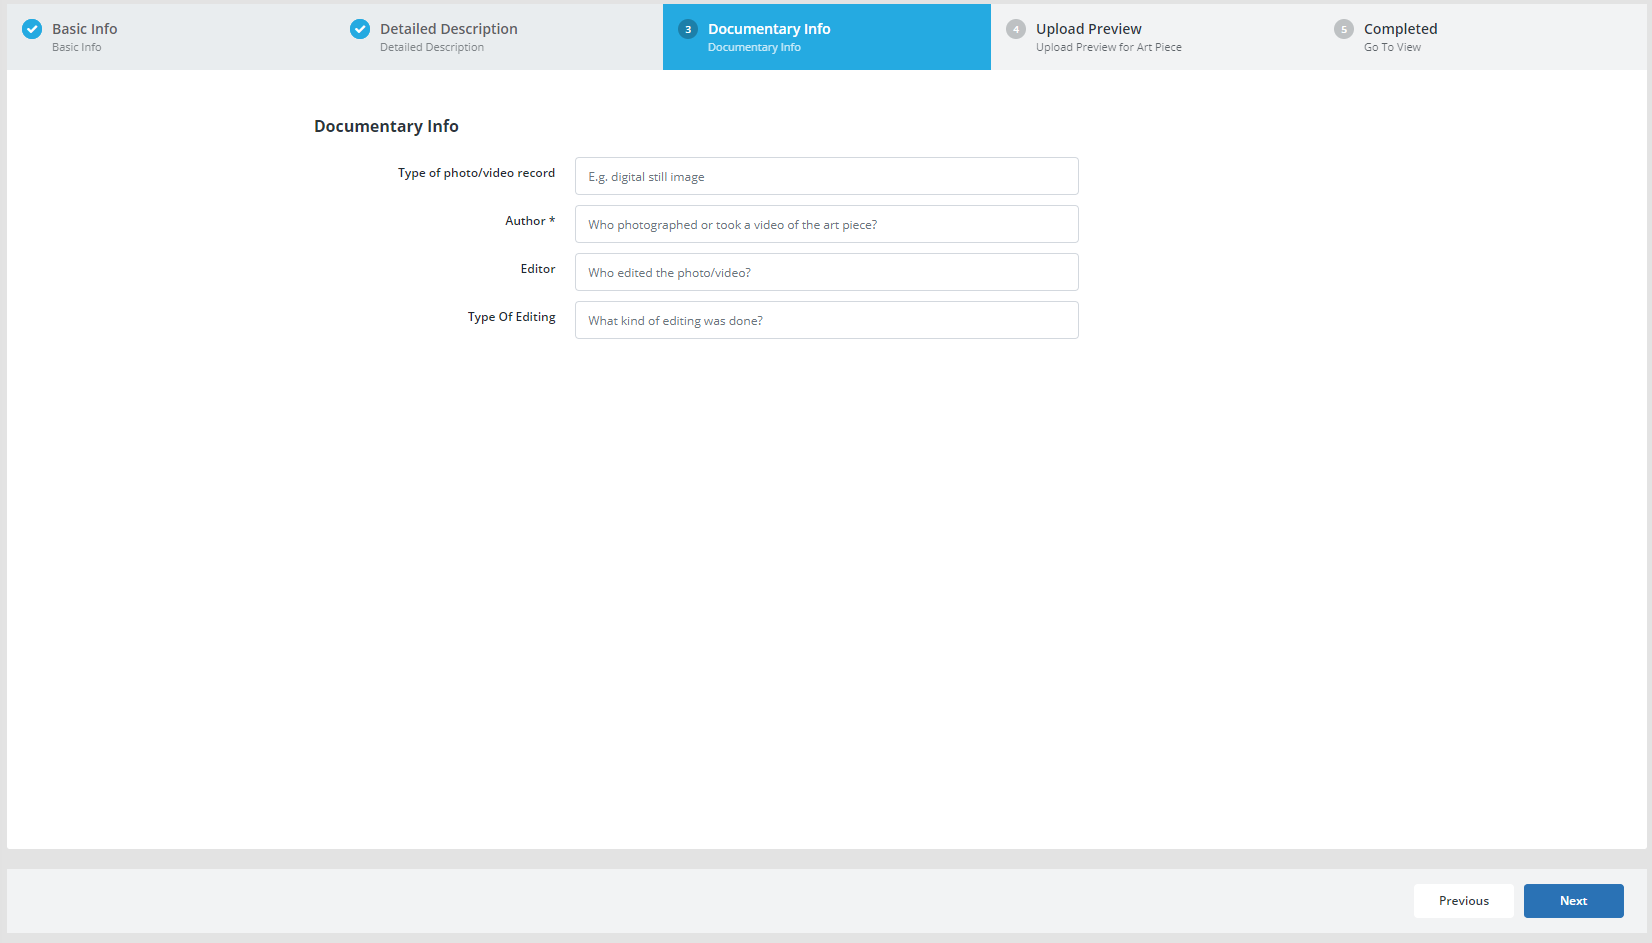
Provide information about the documentation of the art piece: what type of photo/video record is it (e.g digital still image), who is the author of the record (this information is required), who edited the record and what type of editing was done (if applicable)?
STEP 4
Upload the picture of the art piece for preview. Likewise, upload the 3D object (mesh file format).
Optionally, add a voice-over for the art piece; this feature will give your exhibition a new depth and provide your virtual visitors with an audio guide.
STEP 5
You have successfully created a new Art Piece.
Audio
To create a new Audio art piece, follow these steps:
STEP 1
Enter basic information about the art piece: title, artist and creation date.
In order to select an artist, their profile must first be created. If their profile isn't already in the database, please create one,
When entering the creation date, you can choose between two formats: day-month-year (in which case only the year is required in order to move onto the next step) and "circa". In the case of dates like "14th Century" or "Ming Dynasty", use the "circa" override.
STEP 2
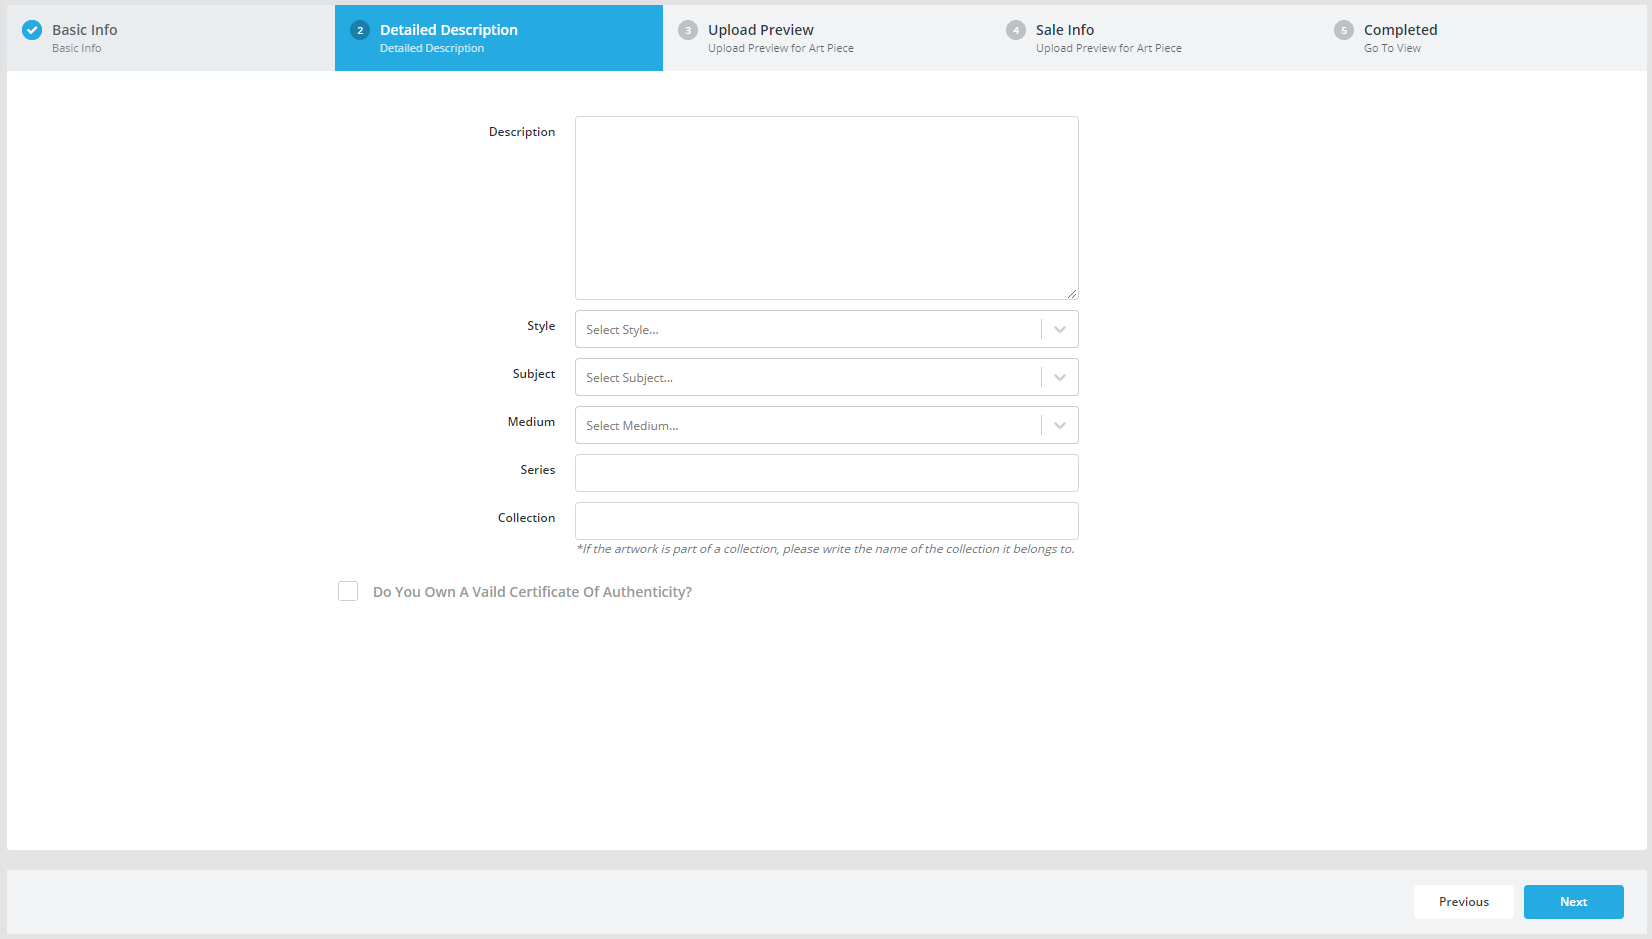
Next, enter more details about the art piece: description, style, subject, medium, series and collection.
None of the information in this step is required, but we strongly advise that you add a description for all art pieces you create as that will enrich your exhibition. Of course, you may come back to this step later once the art piece is successfully created.
The style, subject and medium fields have some suggested options already entered, but you can also add your own by simply writing the word or phrase and pressing 'enter' to confirm.
If the art piece is part of a series or a collection, please add that information here as well.
If you own a valid Certificate of Authenticity for the art piece, please check the box and upload a scanned copy of the certificate.
STEP 3
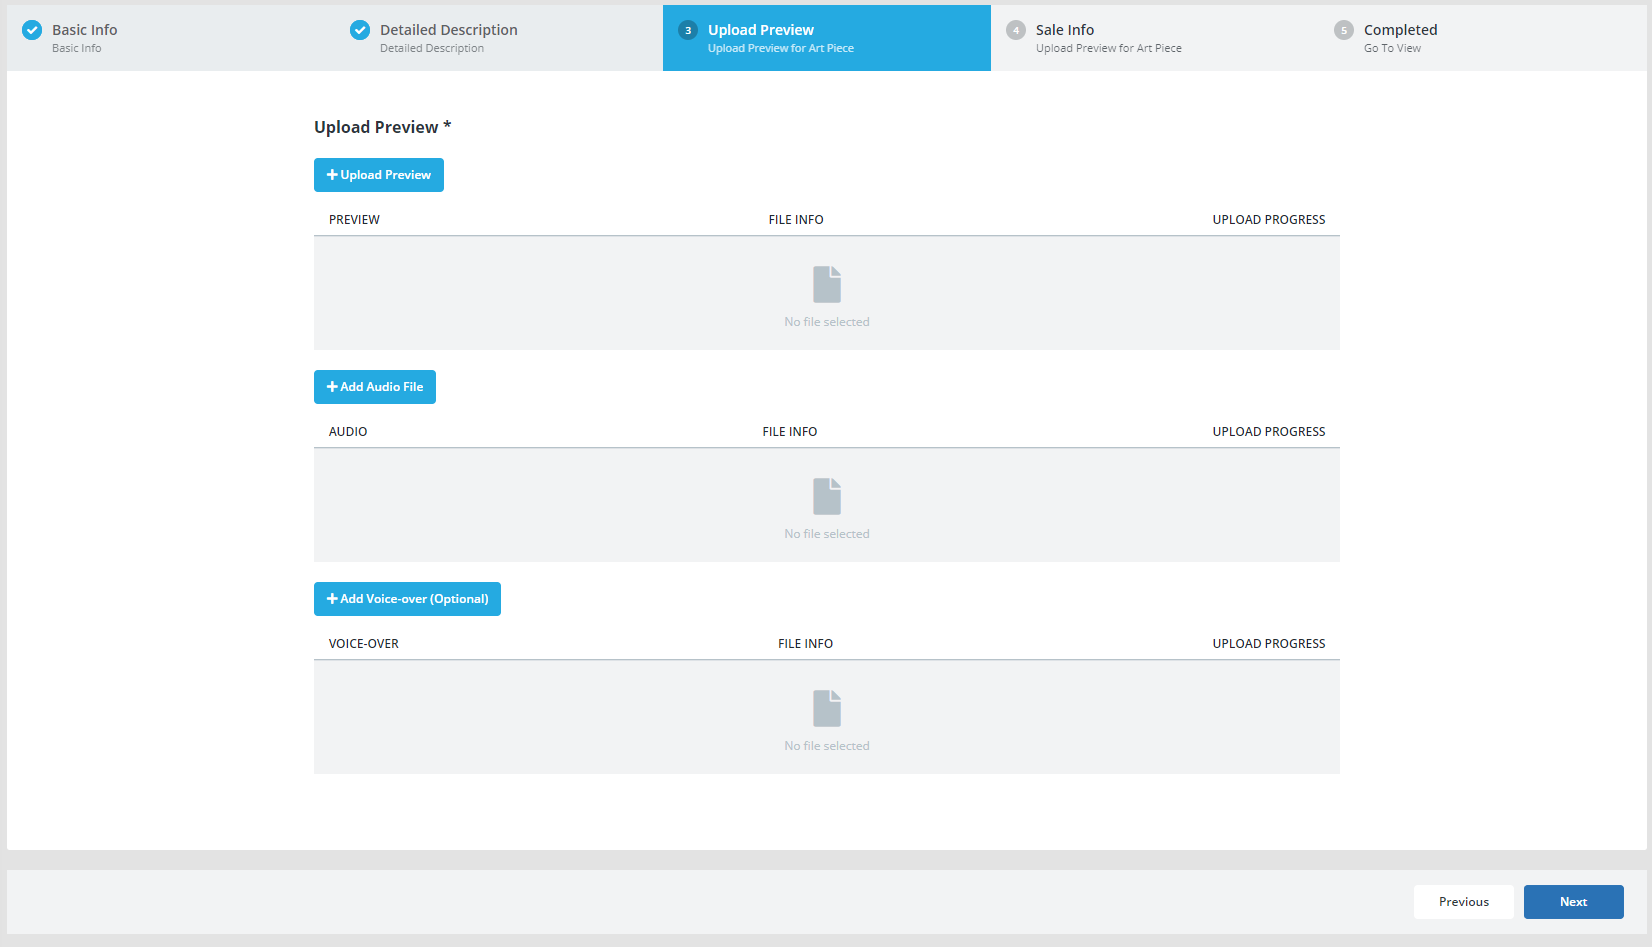
Upload a picture as a preview, not larger than 10 MB. Likewise, upload the audio file itself.
Optionally, add a voice-over for the art piece; this feature will give your exhibition a new depth and provide your virtual visitors with an audio guide.
STEP 4
To select the status of the art piece, choose between the following options: online sale, on sale, not on sale, reserved, sold, on request, and donated.
If applicable, write the price of the art piece and select a currency.
STEP 5
You have successfully created a new Art Piece.
Artifact
To create a new Artifact, follow these steps:
STEP 1
Enter basic information about the artifact: title, artist and creation date.
In order to select an artist, their profile must first be created. If their profile isn't already in the database, please create one,
When entering the creation date, you can choose between two formats: day-month-year (in which case only the year is required in order to move onto the next step) and "circa". In the case of dates like "14th Century" or "Ming Dynasty", use the "circa" override.
STEP 2
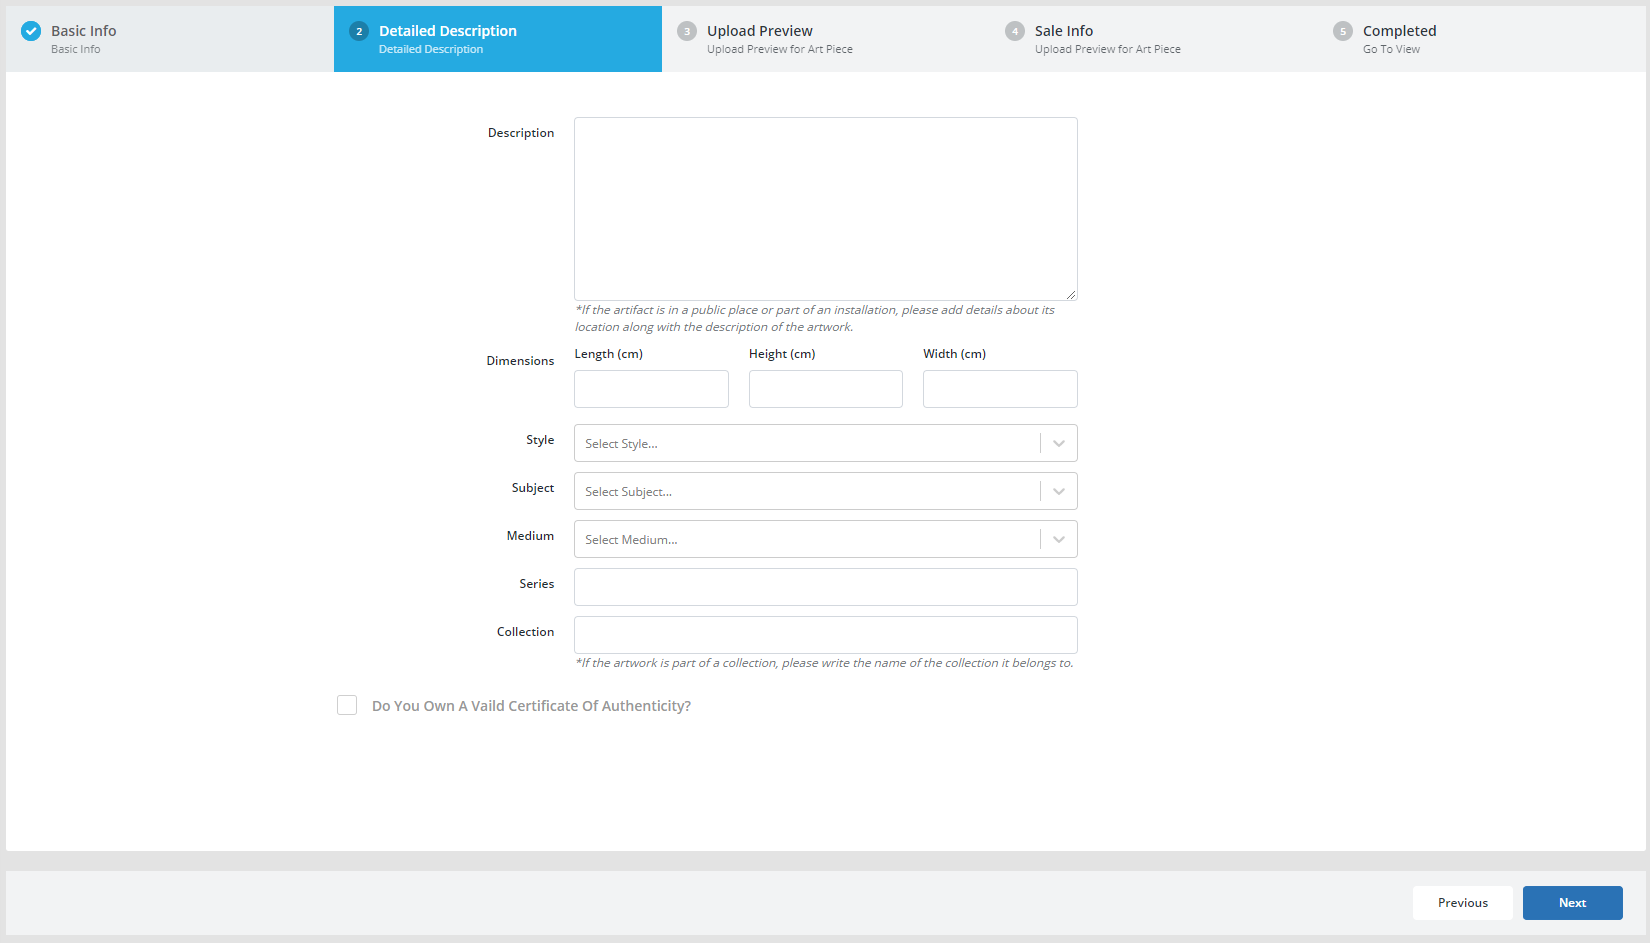
Next, enter more details about the art piece: description, dimensions, style, subject, medium, series and collection.
None of the information in this step is required, but we strongly advise that you add a description for all art pieces you create as that will enrich your exhibition. Of course, you may come back to this step later once the art piece is successfully created.
Enter dimensions as instructed: length x height x width in centimeters. It's important that this data is as accurate as possible because it will directly reflect the art piece's preview in virtual reality.
The style, subject and medium fields have some suggested options already entered, but you can also add your own by simply writing the word or phrase and pressing 'enter' to confirm.
If the art piece is part of a series or a collection, please add that information here as well.
If you own a valid Certificate of Authenticity for the art piece, please check the box and upload a scanned copy of the certificate.
STEP 3
Upload the picture of the art piece for preview. Likewise, upload the 3D object (mesh file format).
Optionally, add a voice-over for the art piece; this feature will give your exhibition a new depth and provide your virtual visitors with an audio guide.
STEP 4
To select the status of the art piece, choose between the following options: online sale, on sale, not on sale, reserved, sold, on request, and donated.
If applicable, write the price of the art piece and select a currency.
STEP 5
You have successfully created a new Art Piece.


No Comments